
Meteor.js 3 + Svelte
In this tutorial, we will create a simple To-Do app using Svelte v5 and Meteor 3.0. Meteor works well with other frameworks like React, Vue 3, Solid, and Blaze.
Svelte is a modern UI framework that compiles your code to highly efficient vanilla JavaScript at build time, resulting in smaller bundles and faster runtime performance. Launched in 2016, it has gained popularity for its simplicity and reactivity without a virtual DOM. Compared to older approaches, Svelte eliminates much of the boilerplate and runtime overhead found in frameworks like React. It uses a declarative syntax with built-in state management, transitions, and stores that can be integrated with Meteor's reactive data sources like Tracker and Minimongo. This means your UI updates automatically as data changes, without manual DOM manipulation.
If you're new and not sure what UI framework to use, Svelte is a great place to start—it's easy to learn, performant, and has a growing community. You can still leverage Meteor packages designed for other frameworks, like accounts-ui, even in a Svelte app.
To start building your Svelte app, you'll need a code editor. If you're unsure which one to choose, Visual Studio Code is a good option.
Let’s begin building your app!
Table of Contents
1: Creating the app
1.1: Install Meteor
First, we need to install Meteor by following this installation guide.
1.2: Create Meteor Project
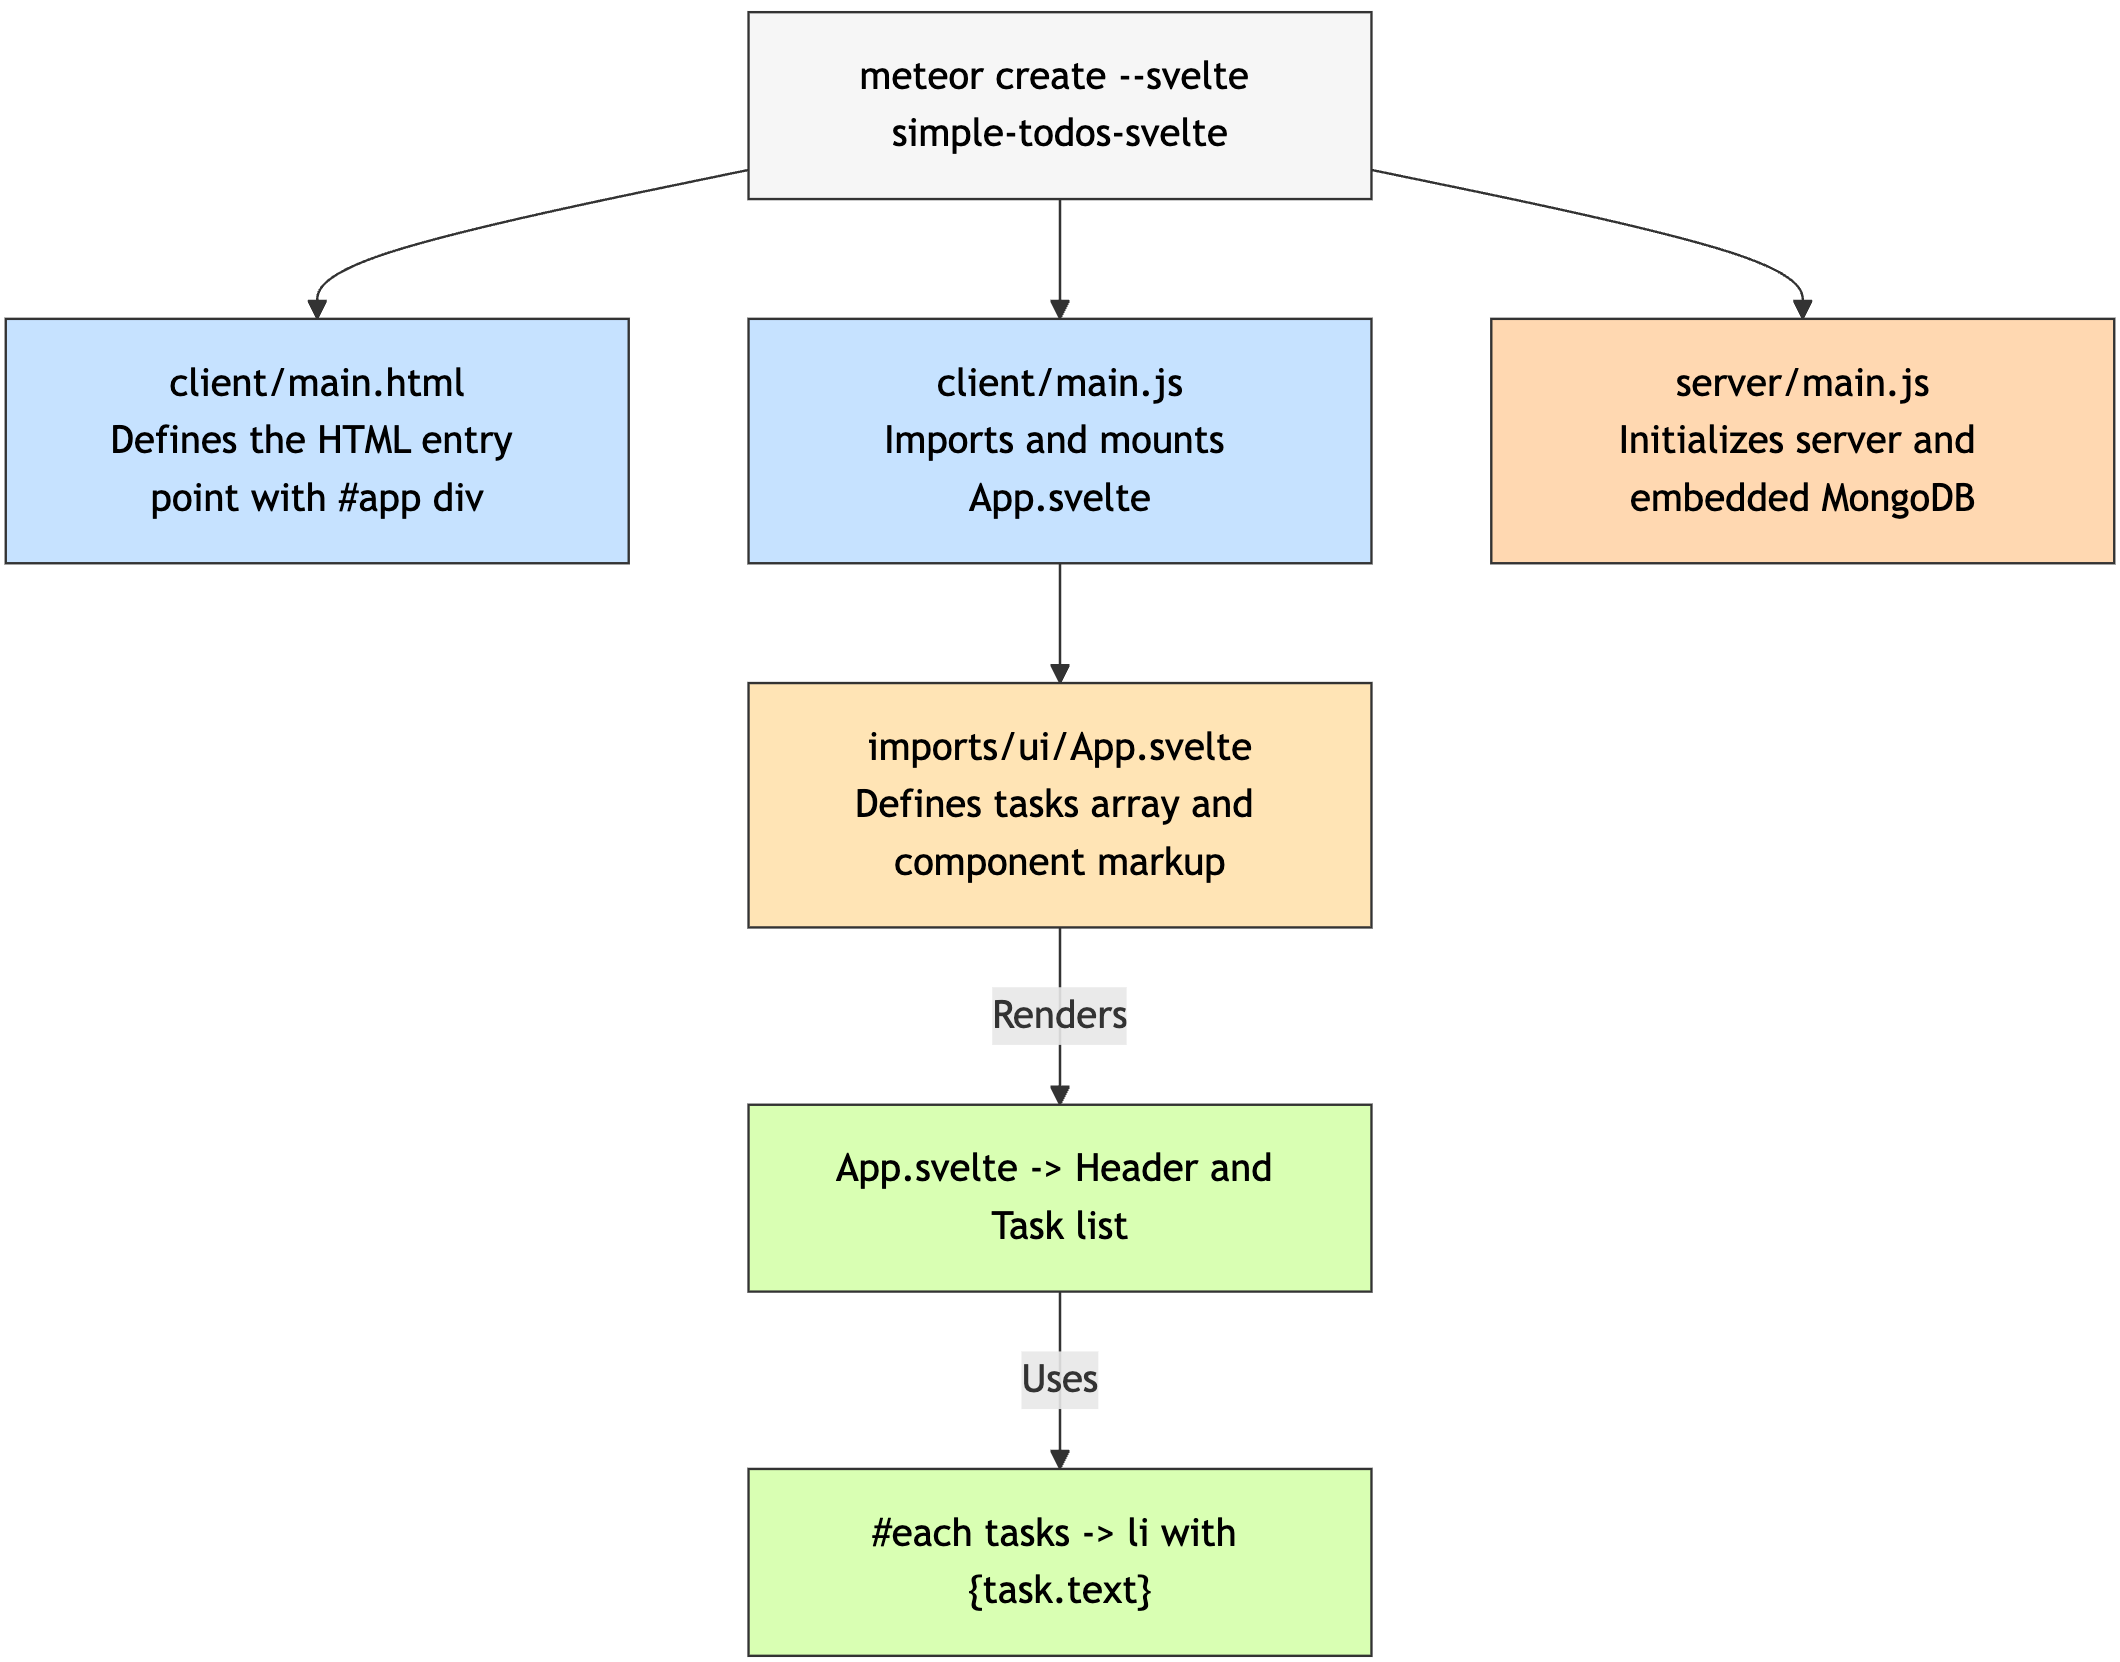
The easiest way to setup Meteor with Svelte is by using the command meteor create with the option --svelte and your project name:
meteor create --svelte simple-todos-svelteMeteor will create all the necessary files for you. With --svelte option, Meteor generates a project using Svelte 5 and Rspack as the bundler, and this is the approach walked through in this tutorial. Using the Rspack bundler is the default convention in Meteor 3.4+, as it improves dev speed, enables more build features, and provides better control over bundle size and configuration.
We provide the final app for both the Rspack and Meteor bundlers. This guide follows the Rspack version and reaches the same final state. The Meteor bundler version is for those who prefer the legacy bundler.
INFO
You can find the final version of this app on GitHub using the Rspack bundler or the Meteor bundler.
The files located in the client directory are setting up your client side (web), you can see for example client/main.html where Meteor is rendering your App main component into the HTML.
Also, check the server directory where Meteor is setting up the server side (Node.js), you can see the server/main.js which would be a good place to initialize your MongoDB database with some data. You don't need to install MongoDB as Meteor provides an embedded version of it ready for you to use.
You can now run your Meteor app using:
meteorDon't worry, Meteor will keep your app in sync with all your changes from now on.
Take a quick look at all the files created by Meteor, you don't need to understand them now but it's good to know where they are.
Your Svelte code will be located inside the imports/ui directory, and the App.svelte file will be the root component of your Svelte To-do app.
1.3: Create Tasks
To start working on our todo list app, let’s replace the code of the default starter app with the code below. From there, we’ll talk about what it does.
First, let’s simplify our HTML entry point like so:
<head>
  <title>Simple todo</title>
</head>

<body>
  <div id="app"></div>
</body>
The client/main.js file should import and render the main Svelte component:
import { Meteor } from 'meteor/meteor';
import App from '../imports/ui/App.svelte';
import { mount, unmount } from 'svelte';

let app; // will hold the mounted instance

Meteor.startup(() => {
  const target = document.getElementById('app');

  // (Re)mount
  app = mount(App, { target });

  // Clean up on HMR so we don't double-mount
  if (import.meta.webpackHot) {
    import.meta.webpackHot.accept();
    import.meta.webpackHot.dispose(() => {
      if (app) {
        // pass the instance you got from mount()
        unmount(app, { outro: false }); // set outro:true if you want transitions
        app = null;
      }
      // optional: clear target to be extra safe
      target.innerHTML = '';
    });
  }
});
Inside the imports/ui folder let us modify App.svelte to display a header and a list of tasks:
<script>
import { Meteor } from "meteor/meteor";
let tasks = [
{ text: 'This is task 1' },
{ text: 'This is task 2' },
{ text: 'This is task 3' },
];
</script>
<div class="container">
<header>
<h1>Todo List</h1>
</header>
<ul>
{#each tasks as task (task.text)}
<li>{task.text}</li>
{/each}
</ul>
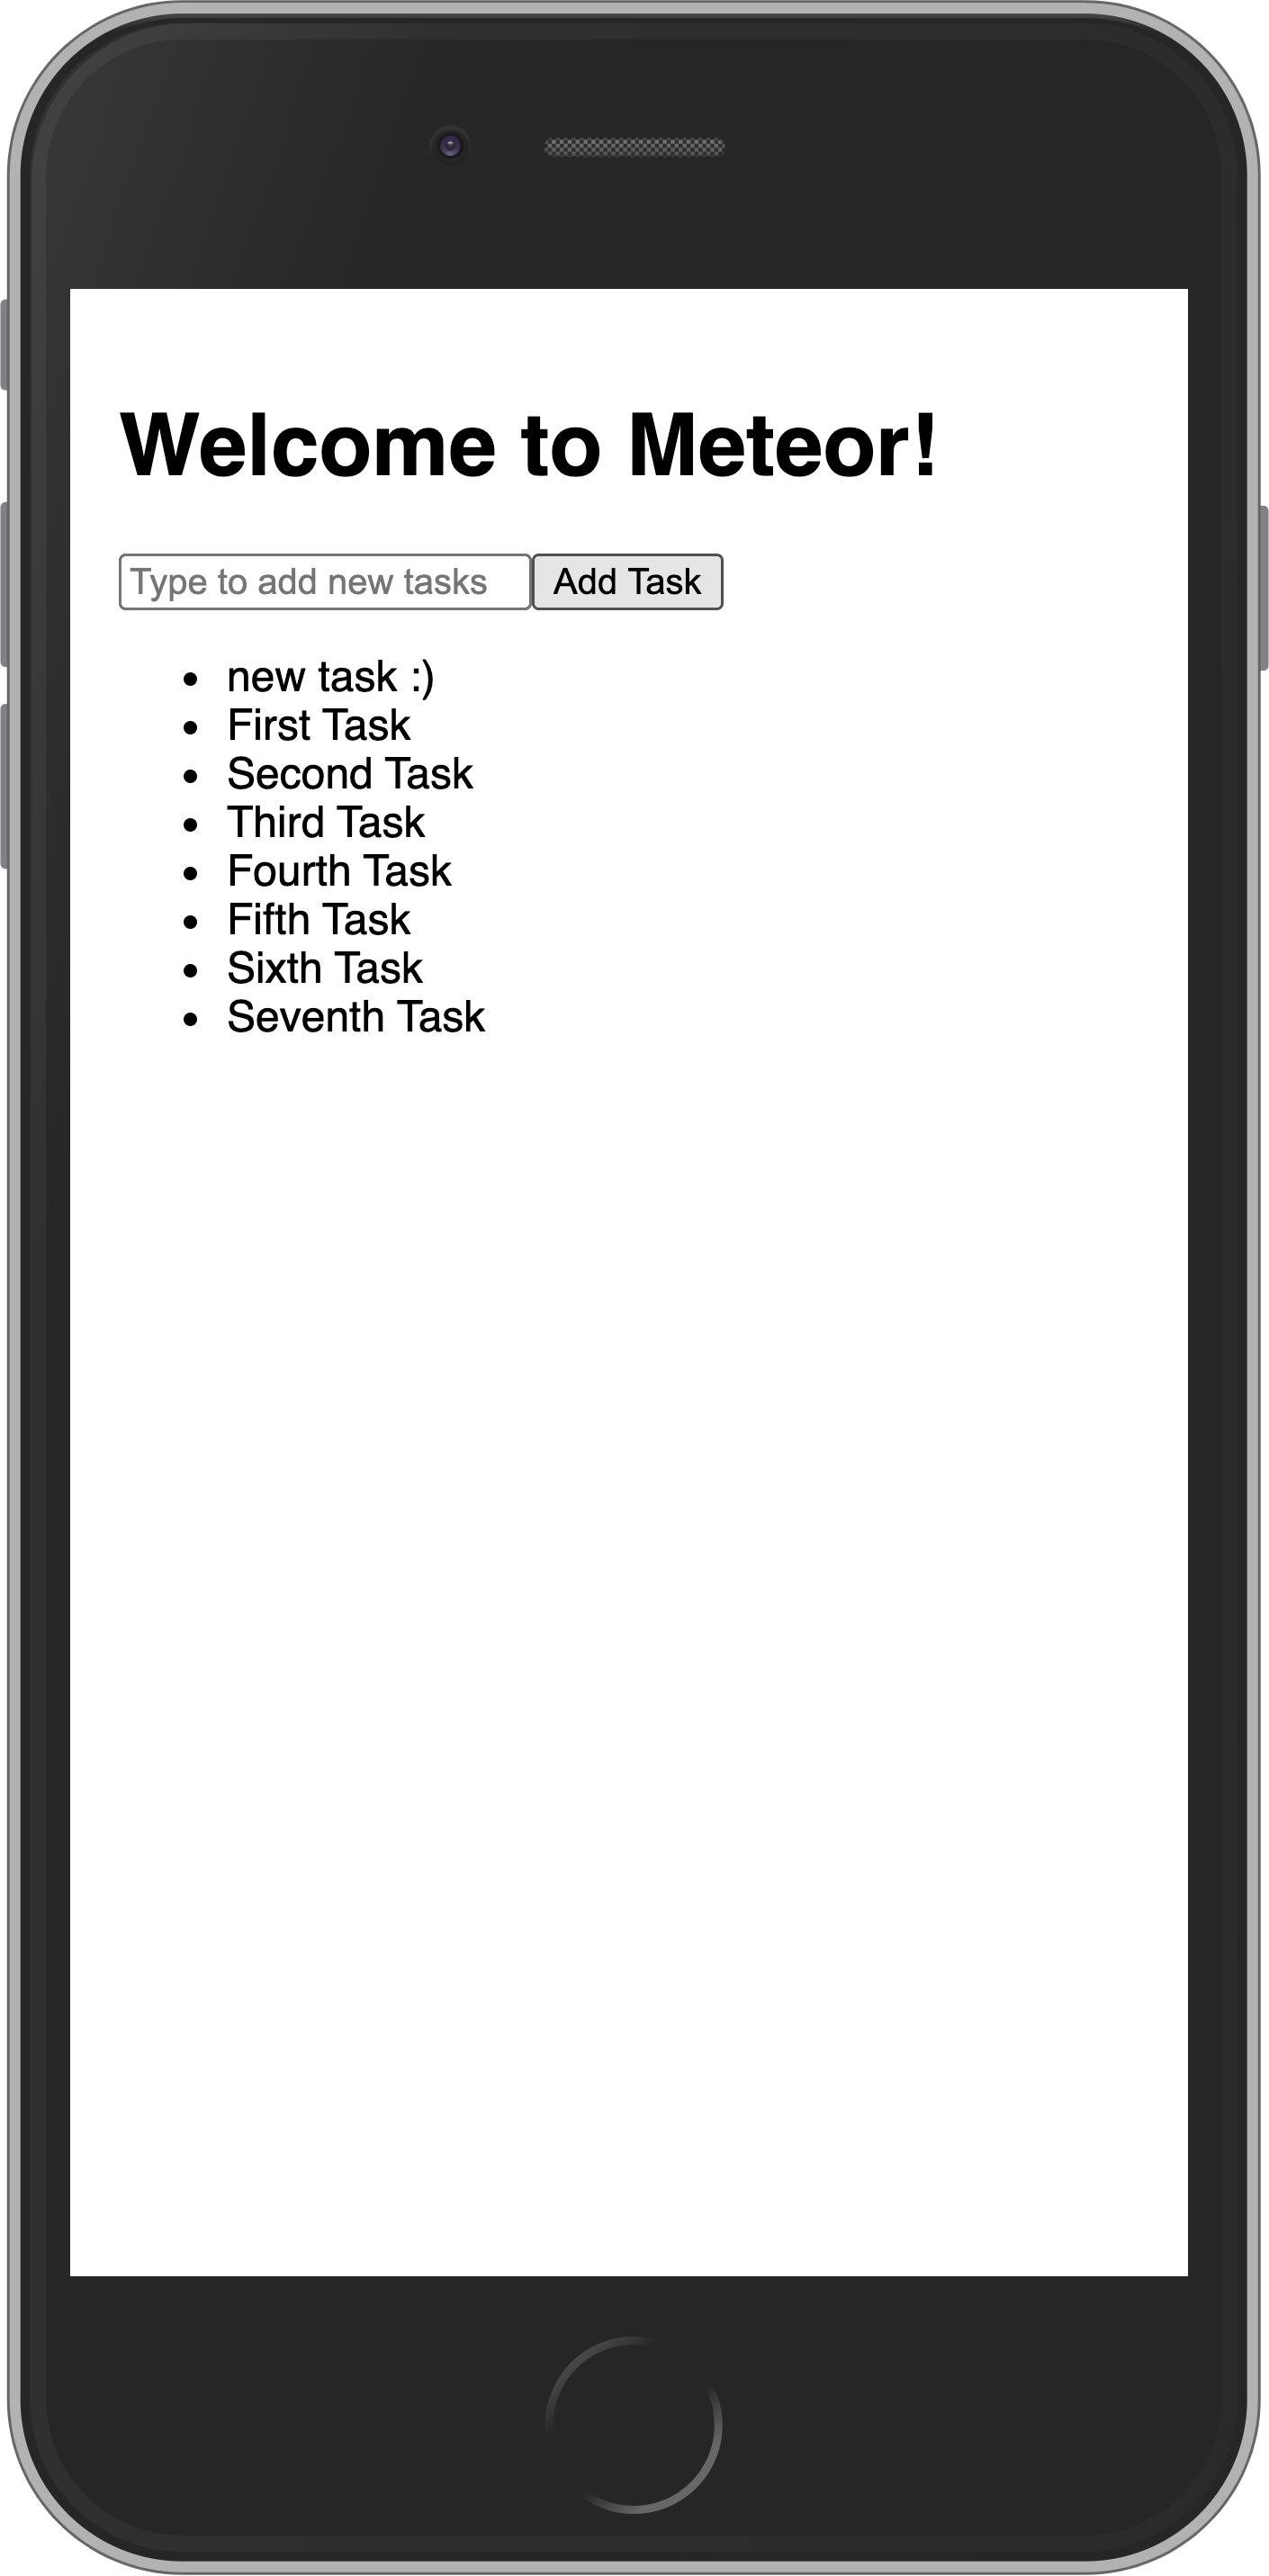
</div>We just modified our main Svelte component App.svelte, which will be rendered into the #app div in the body. It shows a header and a list of tasks. For now, we're using static sample data to display the tasks.
1.4: View Sample Tasks
As you are not connecting to your server and database yet, we’ve defined some sample data directly in App.svelte to render a list of tasks.
At this point meteor should be running on port 3000 so you can visit the running app and see your list with three tasks displayed at http://localhost:3000/ - but if meteor is not running, go to your terminal and move to the top directory of your project and type meteor then press return to launch the app.
All right! Let’s find out what all these bits of code are doing!
1.5: Rendering Data
In Svelte with Meteor, your main entry point is client/main.js, which imports and mounts your root Svelte component App.svelte to a target element in the HTML like <div id="app"></div>
Svelte components are defined in .svelte files, which can include <script>, <style>, and HTML markup. The HTML markup can use Svelte's templating syntax, such as {#each} for looping and {expression} for interpolating data.
You can define reactive data and logic in the <script> tag. In the code above, we defined a tasks array directly in the component. Inside the markup, we use {#each tasks as task} to iterate over the array and display each task's text property using {task.text}
For Meteor-specific reactivity (like subscriptions and collections), Svelte in Meteor uses Tracker and reactive variables to integrate with Meteor's reactivity system. We'll cover that in later steps.
1.6: Mobile Look
Let’s see how your app is looking on mobile. You can simulate a mobile environment by right clicking your app in the browser (we are assuming you are using Google Chrome, as it is the most popular browser) and then inspect, this will open a new window inside your browser called Dev Tools. In the Dev Tools you have a small icon showing a Mobile device and a Tablet:
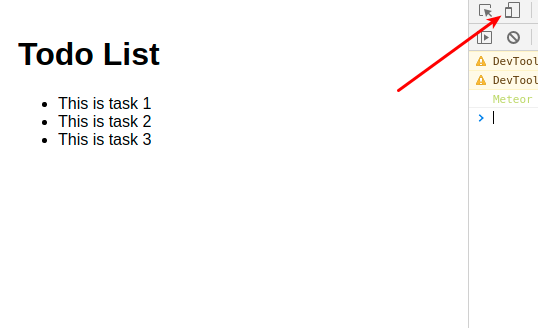
Click on it and then select the phone that you want to simulate and in the top nav bar.
You can also check your app in your personal cellphone. To do so, connect to your App using your local IP in the navigation browser of your mobile browser.
This command should print your local IP for you on Unix systems
ifconfig | grep "inet " | grep -Fv 127.0.0.1 | awk '{print $2}'On Microsoft Windows try this in a command prompt
ipconfig | findstr "IPv4 Address"
You should see the following:
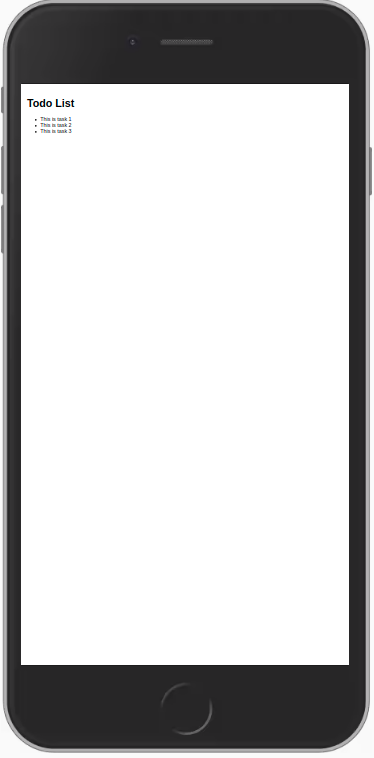
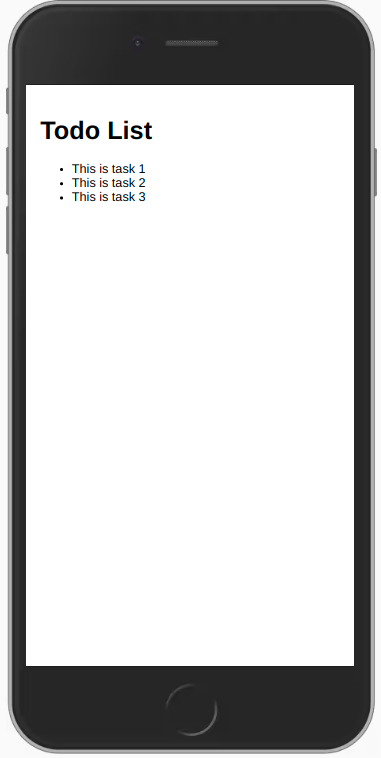
As you can see, everything is small, as we are not adjusting the view port for mobile devices. You can fix this and other similar issues by adding these lines to your client/main.html file, inside the head tag, after the title.
...
  <meta charset="utf-8"/>
  <meta http-equiv="x-ua-compatible" content="ie=edge"/>
  <meta
      name="viewport"
      content="width=device-width, height=device-height, viewport-fit=cover, initial-scale=1, maximum-scale=1, minimum-scale=1, user-scalable=no"
  />
  <meta name="mobile-web-app-capable" content="yes"/>
  <meta name="apple-mobile-web-app-capable" content="yes"/>
...
Now your app should scale properly on mobile devices and look like this:
1.7: Hot Module Replacement
Starting from Meteor 3.4+, new apps use Rspack by default. It includes built-in Hot Module Replacement (HMR) and solid-refresh. This lets you see changes as you make them, even inside Solid components, without losing component state.
If you use a previous Meteor version, you can opt in to the hot-module-replacement which is already added for you. This package updates the javascript modules in a running app that were modified during a rebuild. Reduces the feedback cycle while developing, so you can view and test changes quicker (it even updates the app before the build has finished). You are also not going to lose the state, your app code will be updated, and your state will be the same.
WARNING
hot-module-replacement can still be added to a Meteor app when using Meteor-Rspack with the rspack Atmosphere package enabled (3.4+). It acts as the HMR strategy for modules that are still compiled by the Meteor bundler, such as Atmosphere packages or any files explicitly kept on the Meteor bundler side.
In previous Meteor versions, reactivity with Svelte was often handled by packages like zodern:melte, which provided sugar syntax like $m: for reactive statements. However, with Meteor 3.4+ using the Rspack bundler, we now use a more standard approach that's compatible with the latest Svelte versions.
You can read more about packages here.
WARNING
zodern:melte package is not compatible with Meteor Rspack apps (Meteor 3.4+ using the rspack package). This transition away from zodern:melte brings significant advantages, including support for the latest versions of Svelte 5 and better compatibility with the broader Svelte ecosystem. While we lose some sugar syntax helpers, we gain a more standard and future-proof implementation that will evolve alongside Svelte itself.
You can also opt in to add the package dev-error-overlay when using previous versions, so you can see the errors in your web browser.
meteor add dev-error-overlayYou can try to make some mistakes and then you are going to see the errors in the browser and not only in the console.
In the next step we are going to work with our MongoDB database to be able to store our tasks.
2: Collections
Meteor already sets up MongoDB for you. In order to use our database, we need to create a collection, which is where we will store our documents, in our case our tasks.
You can read more about collections here.
In this step we will implement all the necessary code to have a basic collection for our tasks up and running.
2.1: Create Tasks Collection
We can create a new collection to store our tasks by creating a new file at imports/api/TasksCollection.js which instantiates a new Mongo collection and exports it.
import { Mongo } from "meteor/mongo";

export const TasksCollection = new Mongo.Collection("tasks");
Notice that we stored the file in the imports/api directory, which is a place to store API-related code, like publications and methods. You can name this folder as you want, this is just a choice.
If there is a imports/api/links.js file from the starter project, you can delete that now as we don't need it.
You can read more about app structure and imports/exports here.
2.2: Initialize Tasks Collection
For our collection to work, you need to import it in the server so it sets some plumbing up.
You can either use import "/imports/api/TasksCollection" or import { TasksCollection } from "/imports/api/TasksCollection" if you are going to use on the same file, but make sure it is imported.
Now it is easy to check if there is data or not in our collection, otherwise, we can insert some sample data easily as well.
You don't need to keep the old content of server/main.js.
import { Meteor } from "meteor/meteor";
import { TasksCollection } from "/imports/api/TasksCollection";

const insertTask = async (taskText) =>
  await TasksCollection.insertAsync({ text: taskText });

Meteor.startup(async () => {
  if (await TasksCollection.find().countAsync() === 0) {
    [
      "First Task",
      "Second Task",
      "Third Task",
      "Fourth Task",
      "Fifth Task",
      "Sixth Task",
      "Seventh Task",
    ].forEach(insertTask);
  }
});
So you are importing the TasksCollection and adding a few tasks to it iterating over an array of strings and for each string calling a function to insert this string as our text field in our task document.
2.3: Render Tasks Collection
Now comes the fun part, you will render the tasks with Svelte. That will be pretty simple.
In your App.svelte file, import the TasksCollection file and, instead of returning a static array, return the tasks saved in the database:
<script>
  import { Meteor } from "meteor/meteor";
  import { Tracker } from "meteor/tracker";
  import { onMount, onDestroy } from "svelte";
  import { TasksCollection } from "../api/TasksCollection";

  // Reactive state
  let handle;
  let subIsReady = false;
  let tasks = [];

  let computation;

  onMount(() => {
    handle = Meteor.subscribe("tasks");

    computation = Tracker.autorun(() => {
      subIsReady = handle.ready();
      tasks = TasksCollection.find().fetch();
    });

    return () => {
      computation?.stop?.();
      handle?.stop?.();
    };
  });

  onDestroy(() => {
    computation?.stop?.();
    handle?.stop?.();
  });
</script>

<div class="container">
  <header>
    <h1>Todo List</h1>
  </header>

  <ul>
    {#if subIsReady}
      {#each tasks as task (task._id)}
        <li>{task.text}</li>
      {/each}
    {:else}
      <div>Loading ...</div>
    {/if}
  </ul>
</div>
But wait! Something is missing. If you run your app now, you'll see that you don't render any tasks.
That's because we need to publish our data to the client.
For more information on Publications/Subscriptions, please check our docs.
Meteor doesn't need REST calls. It instead relies on synchronizing the MongoDB on the server with a MiniMongoDB on the client. It does this by first publishing collections on the server and then subscribing to them on the client.
First, create a publication for our tasks:
import { Meteor } from "meteor/meteor";
import { TasksCollection } from "./TasksCollection";

Meteor.publish("tasks", function () {
  return TasksCollection.find();
});
Now, we need to import this file in our server:
...
import { TasksCollection } from '/imports/api/TasksCollection';

import "../imports/api/TasksPublications";

const insertTask = taskText => TasksCollection.insertAsync({ text: taskText });
...
The only thing left is subscribe to this publication, which we've already added in App.svelte using Tracker and lifecycle hooks:
...
onMount(() => {
handle = Meteor.subscribe("tasks");
computation = Tracker.autorun(() => {
// Reactive code here
});
});
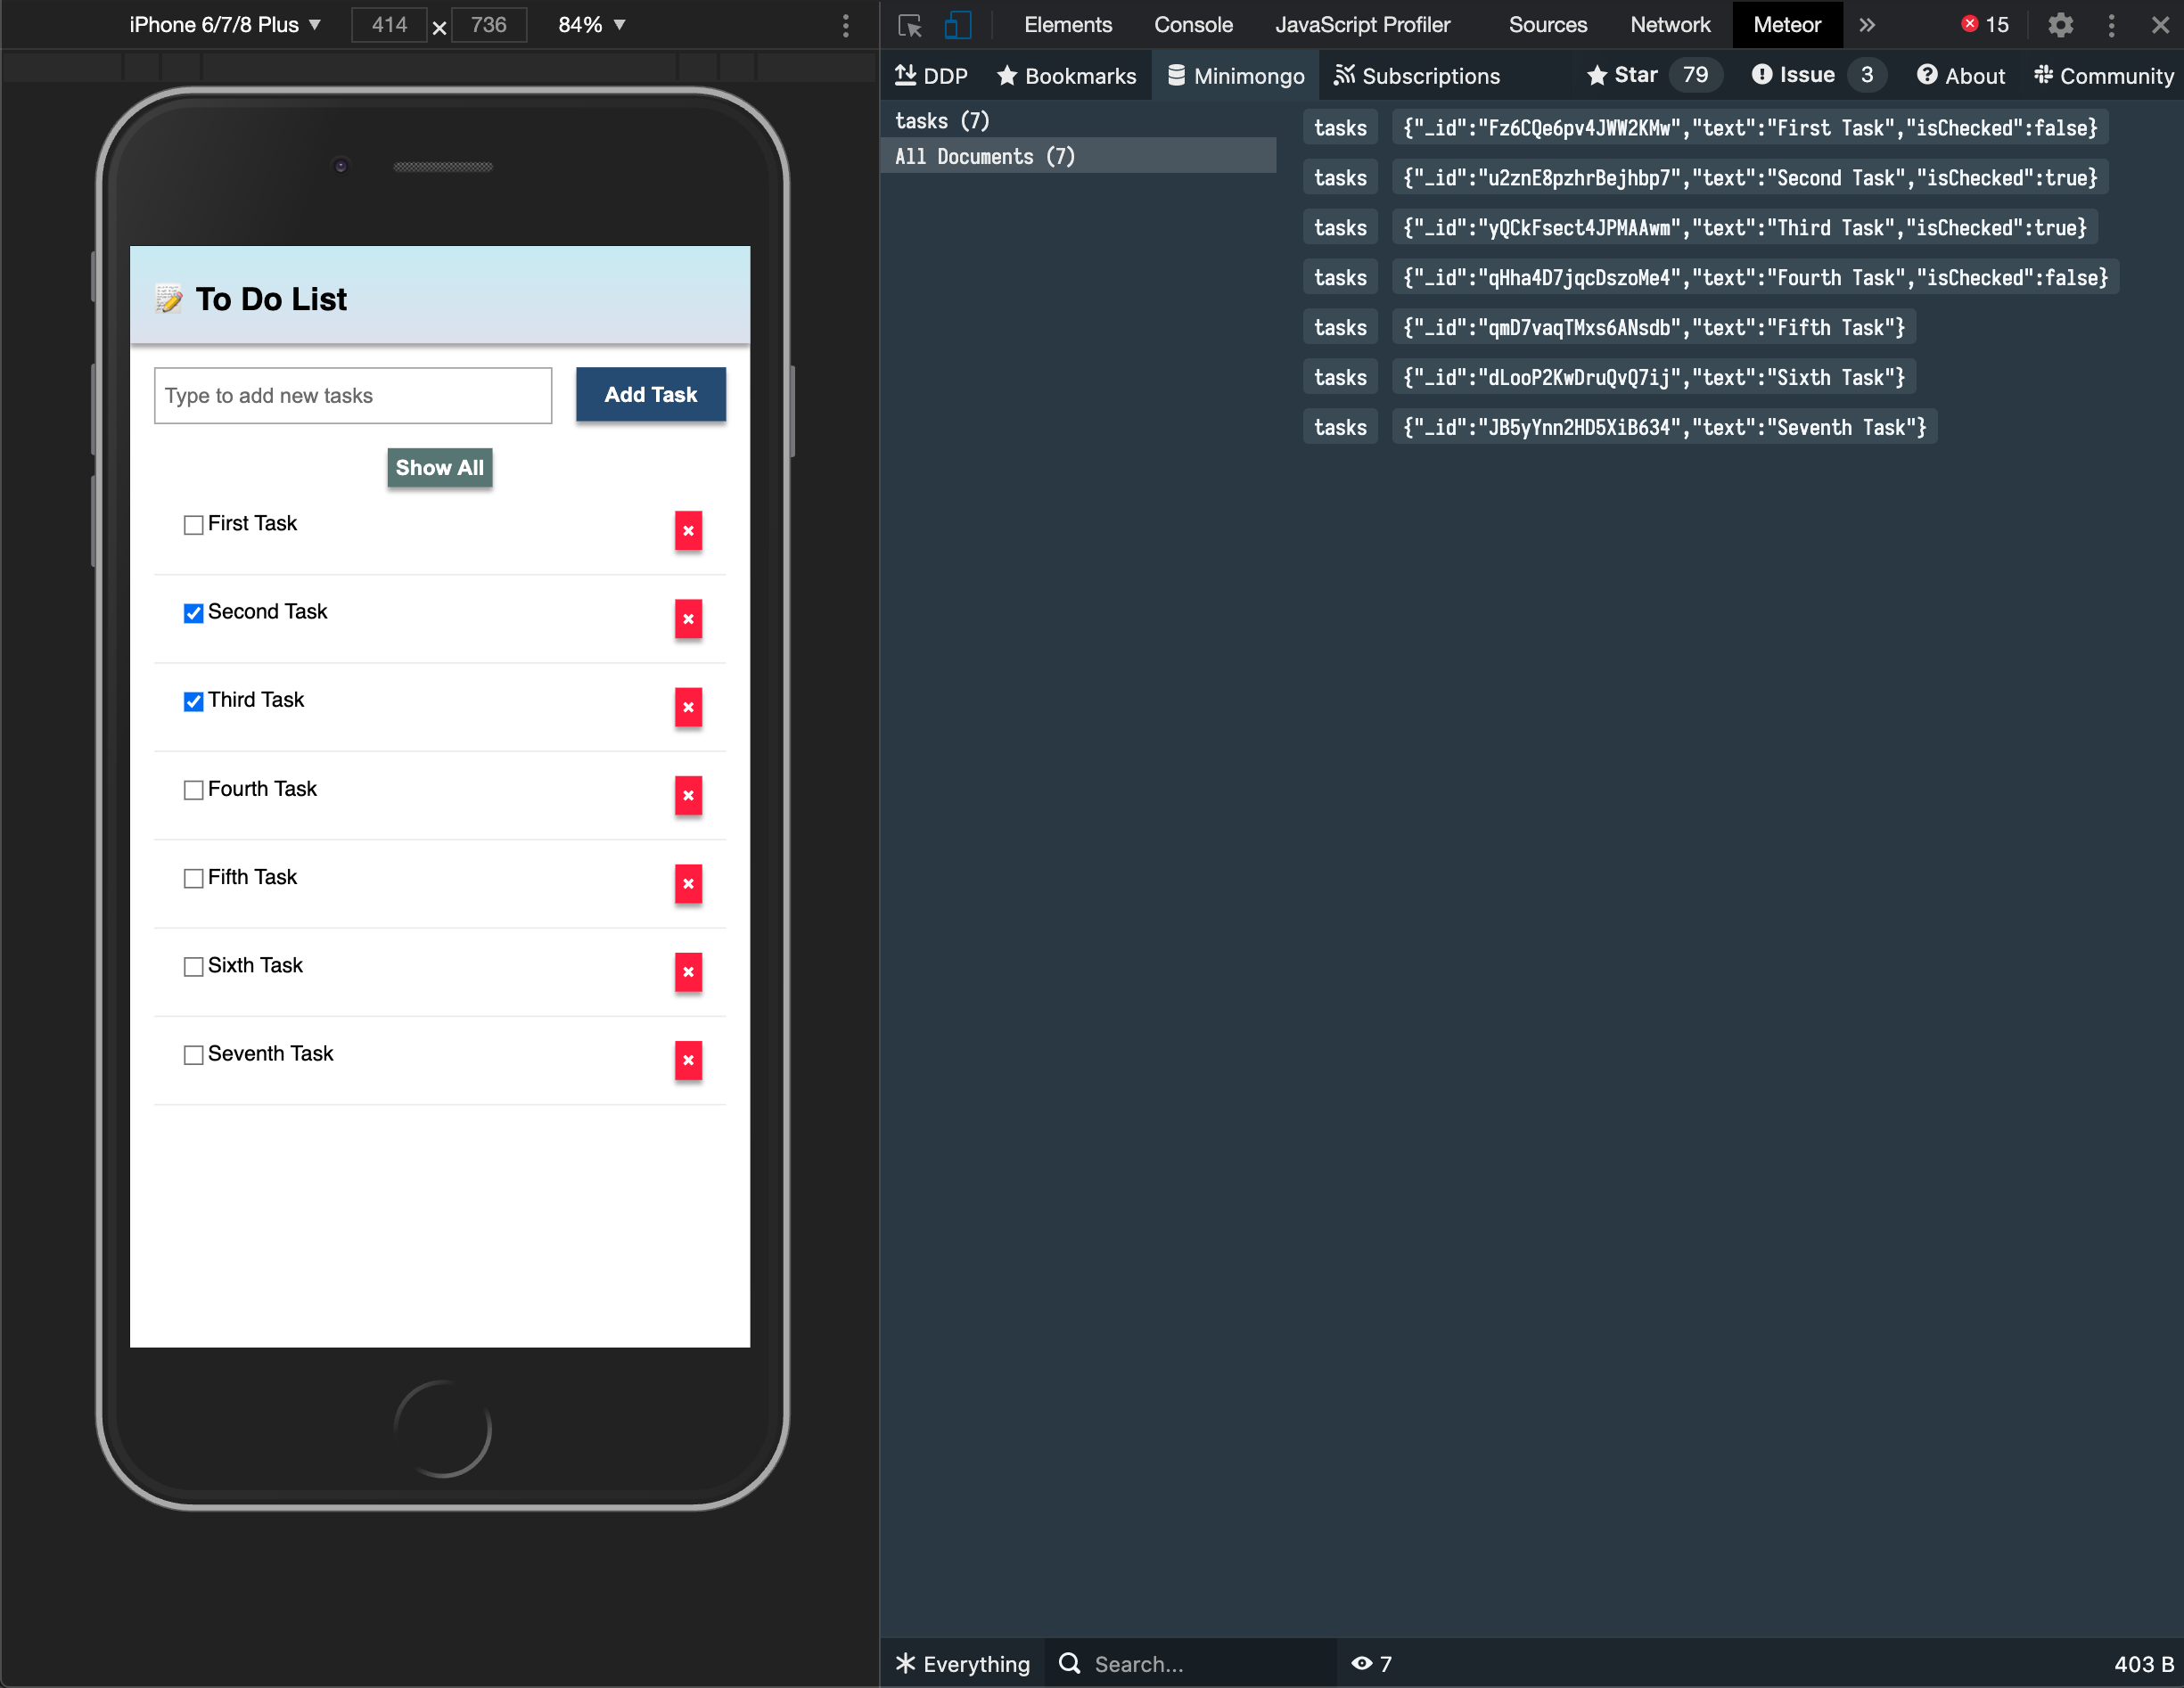
...See how your app should look like now:

You can change your data on MongoDB in the server and your app will react and re-render for you.
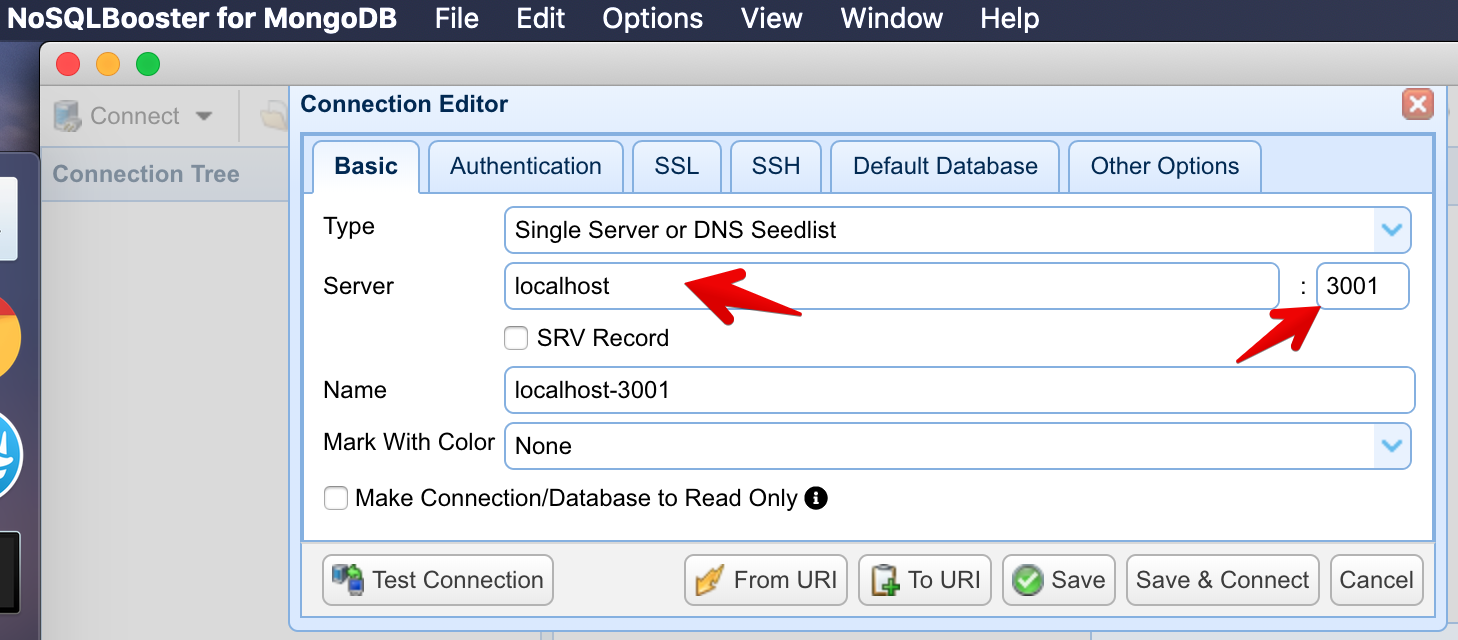
You can connect to your MongoDB running meteor mongo in the terminal from your app folder or using a Mongo UI client, like NoSQLBooster. Your embedded MongoDB is running in port 3001.
See how to connect:
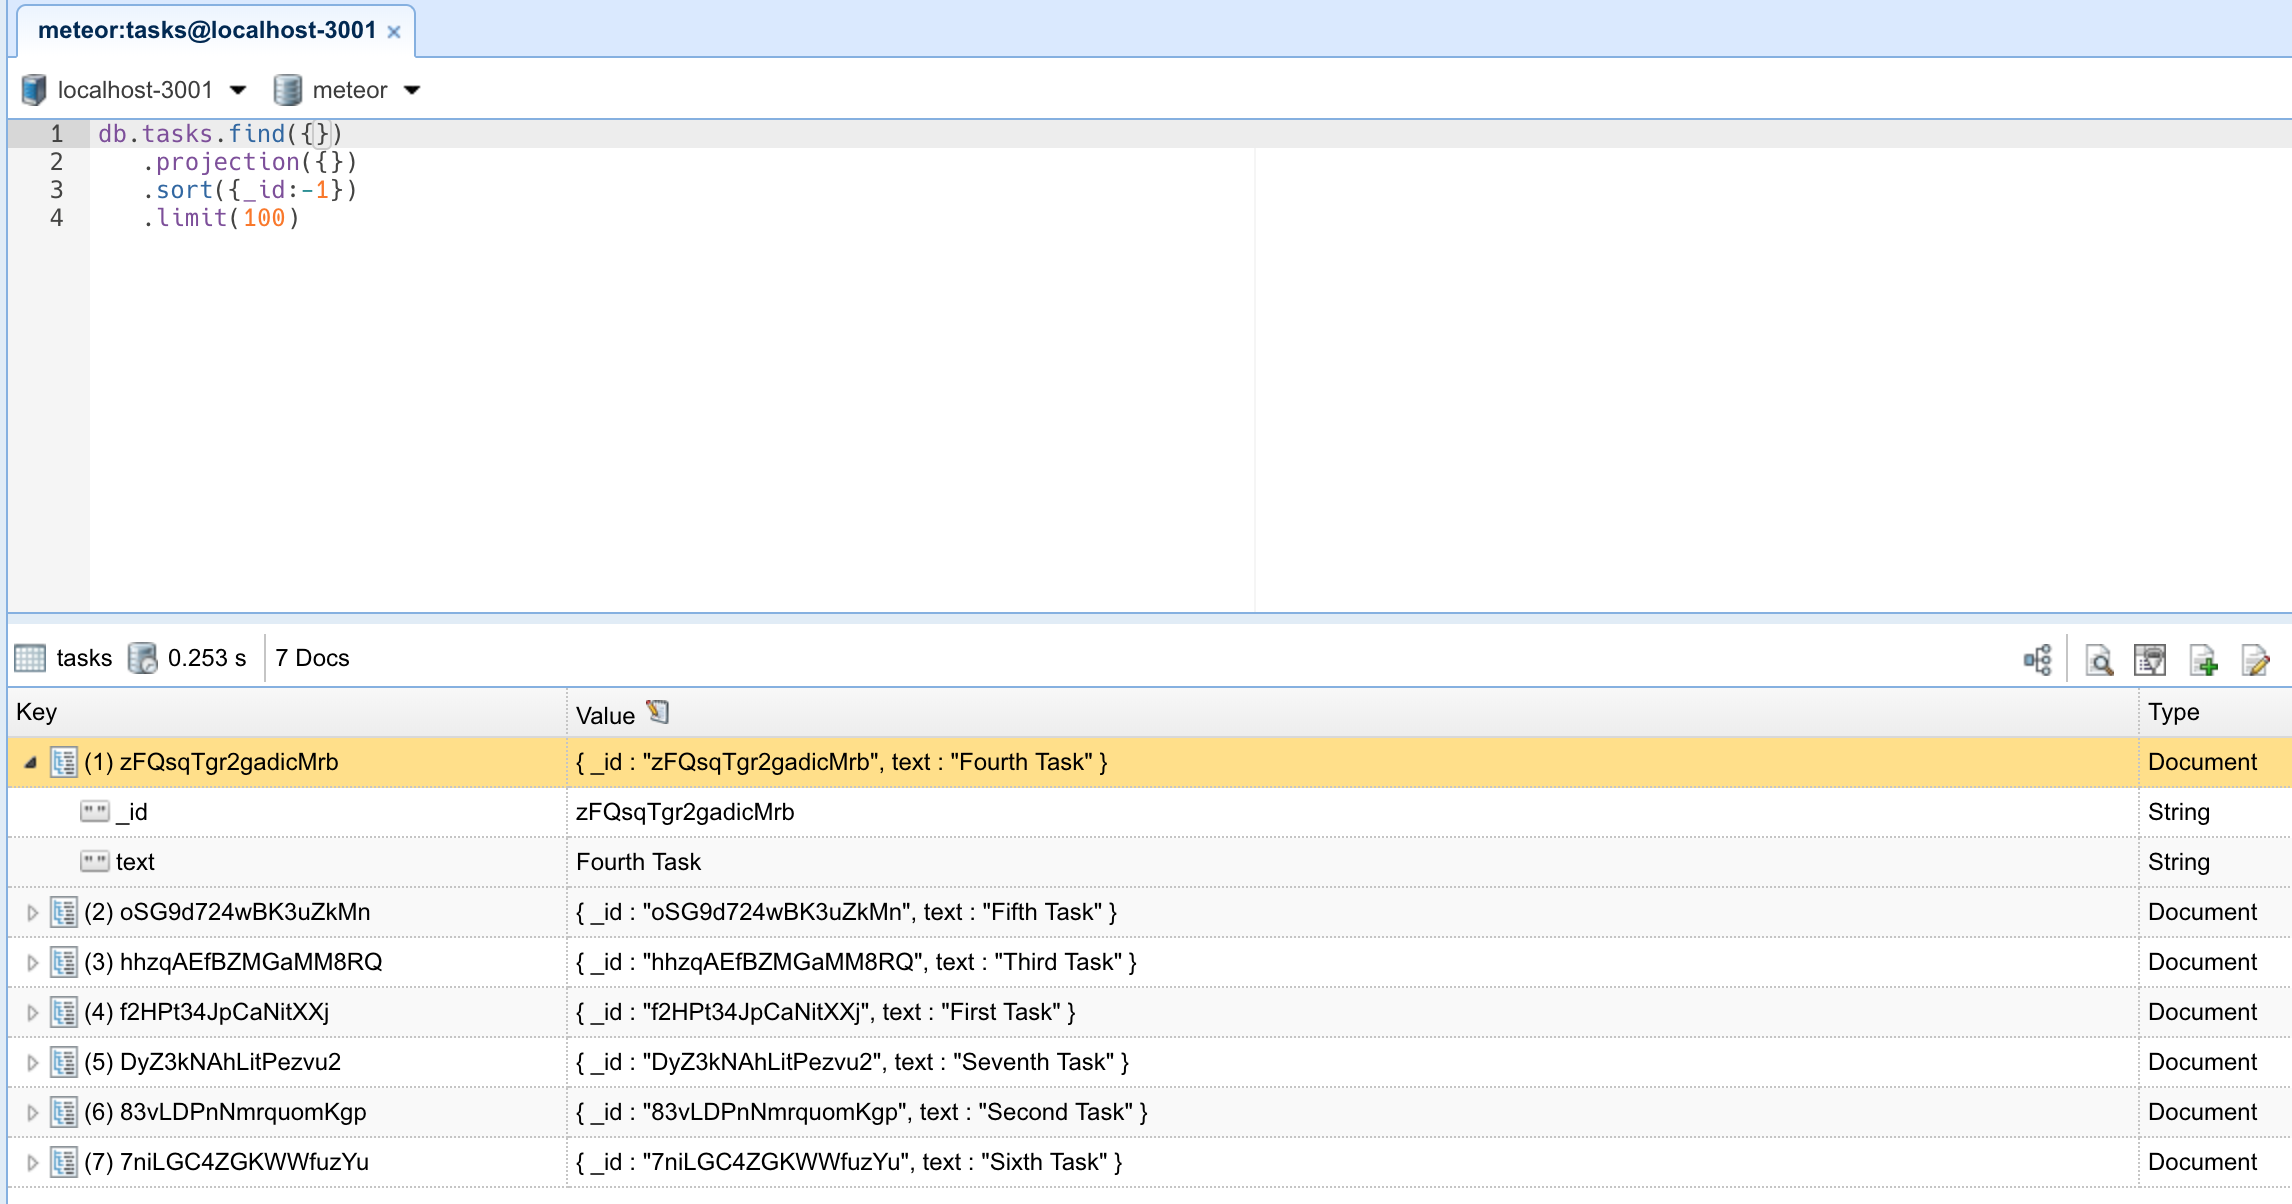
See your database:
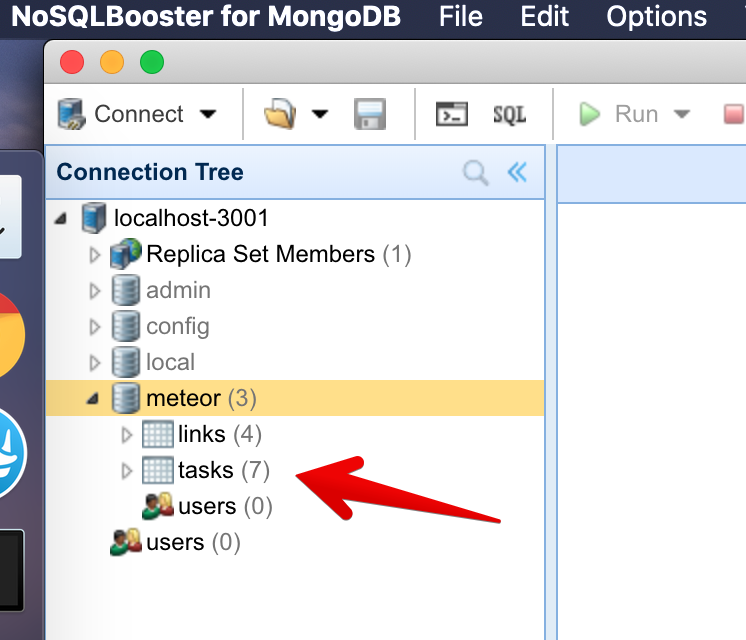
You can double-click your collection to see the documents stored on it:
In the next step, we are going to create tasks using a form.
3: Forms and Events
All apps need to allow the user to perform some sort of interaction with the data that is stored. In our case, the first type of interaction is to insert new tasks. Without it, our To-Do app wouldn't be very helpful.
One of the main ways in which a user can insert or edit data on a website is through forms. In most cases, it is a good idea to use the <form> tag since it gives semantic meaning to the elements inside it.
3.1: Create Task Form
Create a new form inside the App.svelte file, and inside we’ll add an input field and a button. Place it between the header and the ul:
...

<form class="task-form" on:submit={addTask}>
  <input type="text" placeholder="Type to add new tasks" bind:value={newTask} />
  <button type="submit">Add Task</button>
</form>

...
Let's now add an addTask() function handler inside the script tags below the imports. It will call a Meteor method tasks.insert that isn't yet created but we'll soon make:
...

  let newTask = '';

  async function addTask(event) {
    event.preventDefault();
    if (newTask.trim()) {
      await Meteor.callAsync("tasks.insert", {
        text: newTask,
        createdAt: new Date(),
      });
      newTask = '';
    }
  }

...
Altogether, our file should look like:
<script>
  import { Meteor } from "meteor/meteor";
  import { Tracker } from "meteor/tracker";
  import { onMount, onDestroy } from "svelte";
  import { TasksCollection } from "../api/TasksCollection";

  let newTask = '';

  async function addTask(event) {
    event.preventDefault();
    if (newTask.trim()) {
      await Meteor.callAsync("tasks.insert", {
        text: newTask,
        createdAt: new Date(),
      });
      newTask = '';
    }
  }

  // Reactive state
  let handle;
  let subIsReady = false;
  let tasks = [];

  let computation;

  onMount(() => {
    handle = Meteor.subscribe("tasks");

    computation = Tracker.autorun(() => {
      subIsReady = handle.ready();
      tasks = TasksCollection.find().fetch();
    });

    return () => {
      computation?.stop?.();
      handle?.stop?.();
    };
  });

  onDestroy(() => {
    computation?.stop?.();
    handle?.stop?.();
  });
</script>

<div class="container">
  <header>
    <h1>Todo List</h1>
  </header>

  <form class="task-form" on:submit={addTask}>
    <input type="text" placeholder="Type to add new tasks" bind:value={newTask} />
    <button type="submit">Add Task</button>
  </form>

  <ul>
    {#if subIsReady}
      {#each tasks as task (task._id)}
        <li>{task.text}</li>
      {/each}
    {:else}
      <div>Loading ...</div>
    {/if}
  </ul>
</div>
In the code above, we've integrated the form directly into the App.svelte component, positioning it above the task list. We're using Svelte's bind:value for two-way binding on the input and an on:submit handler for form submission.
3.2: Update the Stylesheet
You also can style it as you wish. For now, we only need some margin at the top so the form doesn't seem off the mark. Add the CSS class .task-form, this needs to be the same name in your class attribute in the form element.
...

.task-form {
  margin-top: 1rem;
}

...
3.3: Add Submit Handler
Now let's create a function to handle the form submit and insert a new task into the database. To do it, we will need to implement a Meteor Method.
Methods are essentially RPC calls to the server that let you perform operations on the server side securely. You can read more about Meteor Methods here.
To create your methods, you can create a file called TasksMethods.js.
import { Meteor } from "meteor/meteor";
import { TasksCollection } from "./TasksCollection";

Meteor.methods({
  "tasks.insert"(doc) {
    return TasksCollection.insertAsync(doc);
  },
});
Remember to import your method on the main.js server file, delete the insertTask function, and invoke the new meteor method inside the forEach block.
import { Meteor } from "meteor/meteor";
import { TasksCollection } from "/imports/api/TasksCollection";
import "../imports/api/TasksPublications";
import "../imports/api/TasksMethods";

Meteor.startup(async () => {
  if ((await TasksCollection.find().countAsync()) === 0) {
    [
      "First Task",
      "Second Task",
      "Third Task",
      "Fourth Task",
      "Fifth Task",
      "Sixth Task",
      "Seventh Task",
    ].forEach((taskName) => {
      Meteor.callAsync("tasks.insert", {
        text: taskName,
        createdAt: new Date(),
      });
    });
  }
});
Inside the forEach function, we are adding a task to the tasks collection by calling Meteor.callAsync(). The first argument is the name of the method we want to call, and the second argument is the text of the task.
Also, insert a date createdAt in your task document so you know when each task was created.
Now we need to import TasksMethods.js and add a listener to the submit event on the form:
<script>
  import { Meteor } from "meteor/meteor";
  import { TasksCollection } from "../api/TasksCollection";
  import "/imports/api/TasksMethods"; // this import allows for optimistic execution //

  // ... rest of the script remains the same
</script>

<!-- markup remains the same -->
In the addTask function (shown in 3.1), we prevent the default form submission, get the input value, call the Meteor method to insert the task optimistically, and clear the input.
Meteor methods execute optimistically on the client using MiniMongo while simultaneously calling the server. If the server call fails, MiniMongo rolls back the change, providing a speedy user experience. It's a bit like rollback netcode in fighting video games.
3.4: Show Newest Tasks First
Now you just need to make a change that will make users happy: we need to show the newest tasks first. We can accomplish this quite quickly by sorting our Mongo query.
<script>
// ... other imports and code
// Update the Tracker.autorun to include sorting
onMount(() => {
handle = Meteor.subscribe("tasks");
computation = Tracker.autorun(() => {
subIsReady = handle.ready();
tasks = TasksCollection.find({}, { sort: { createdAt: -1 } }).fetch();
});
// ... rest of onMount remains the same
});
</script>
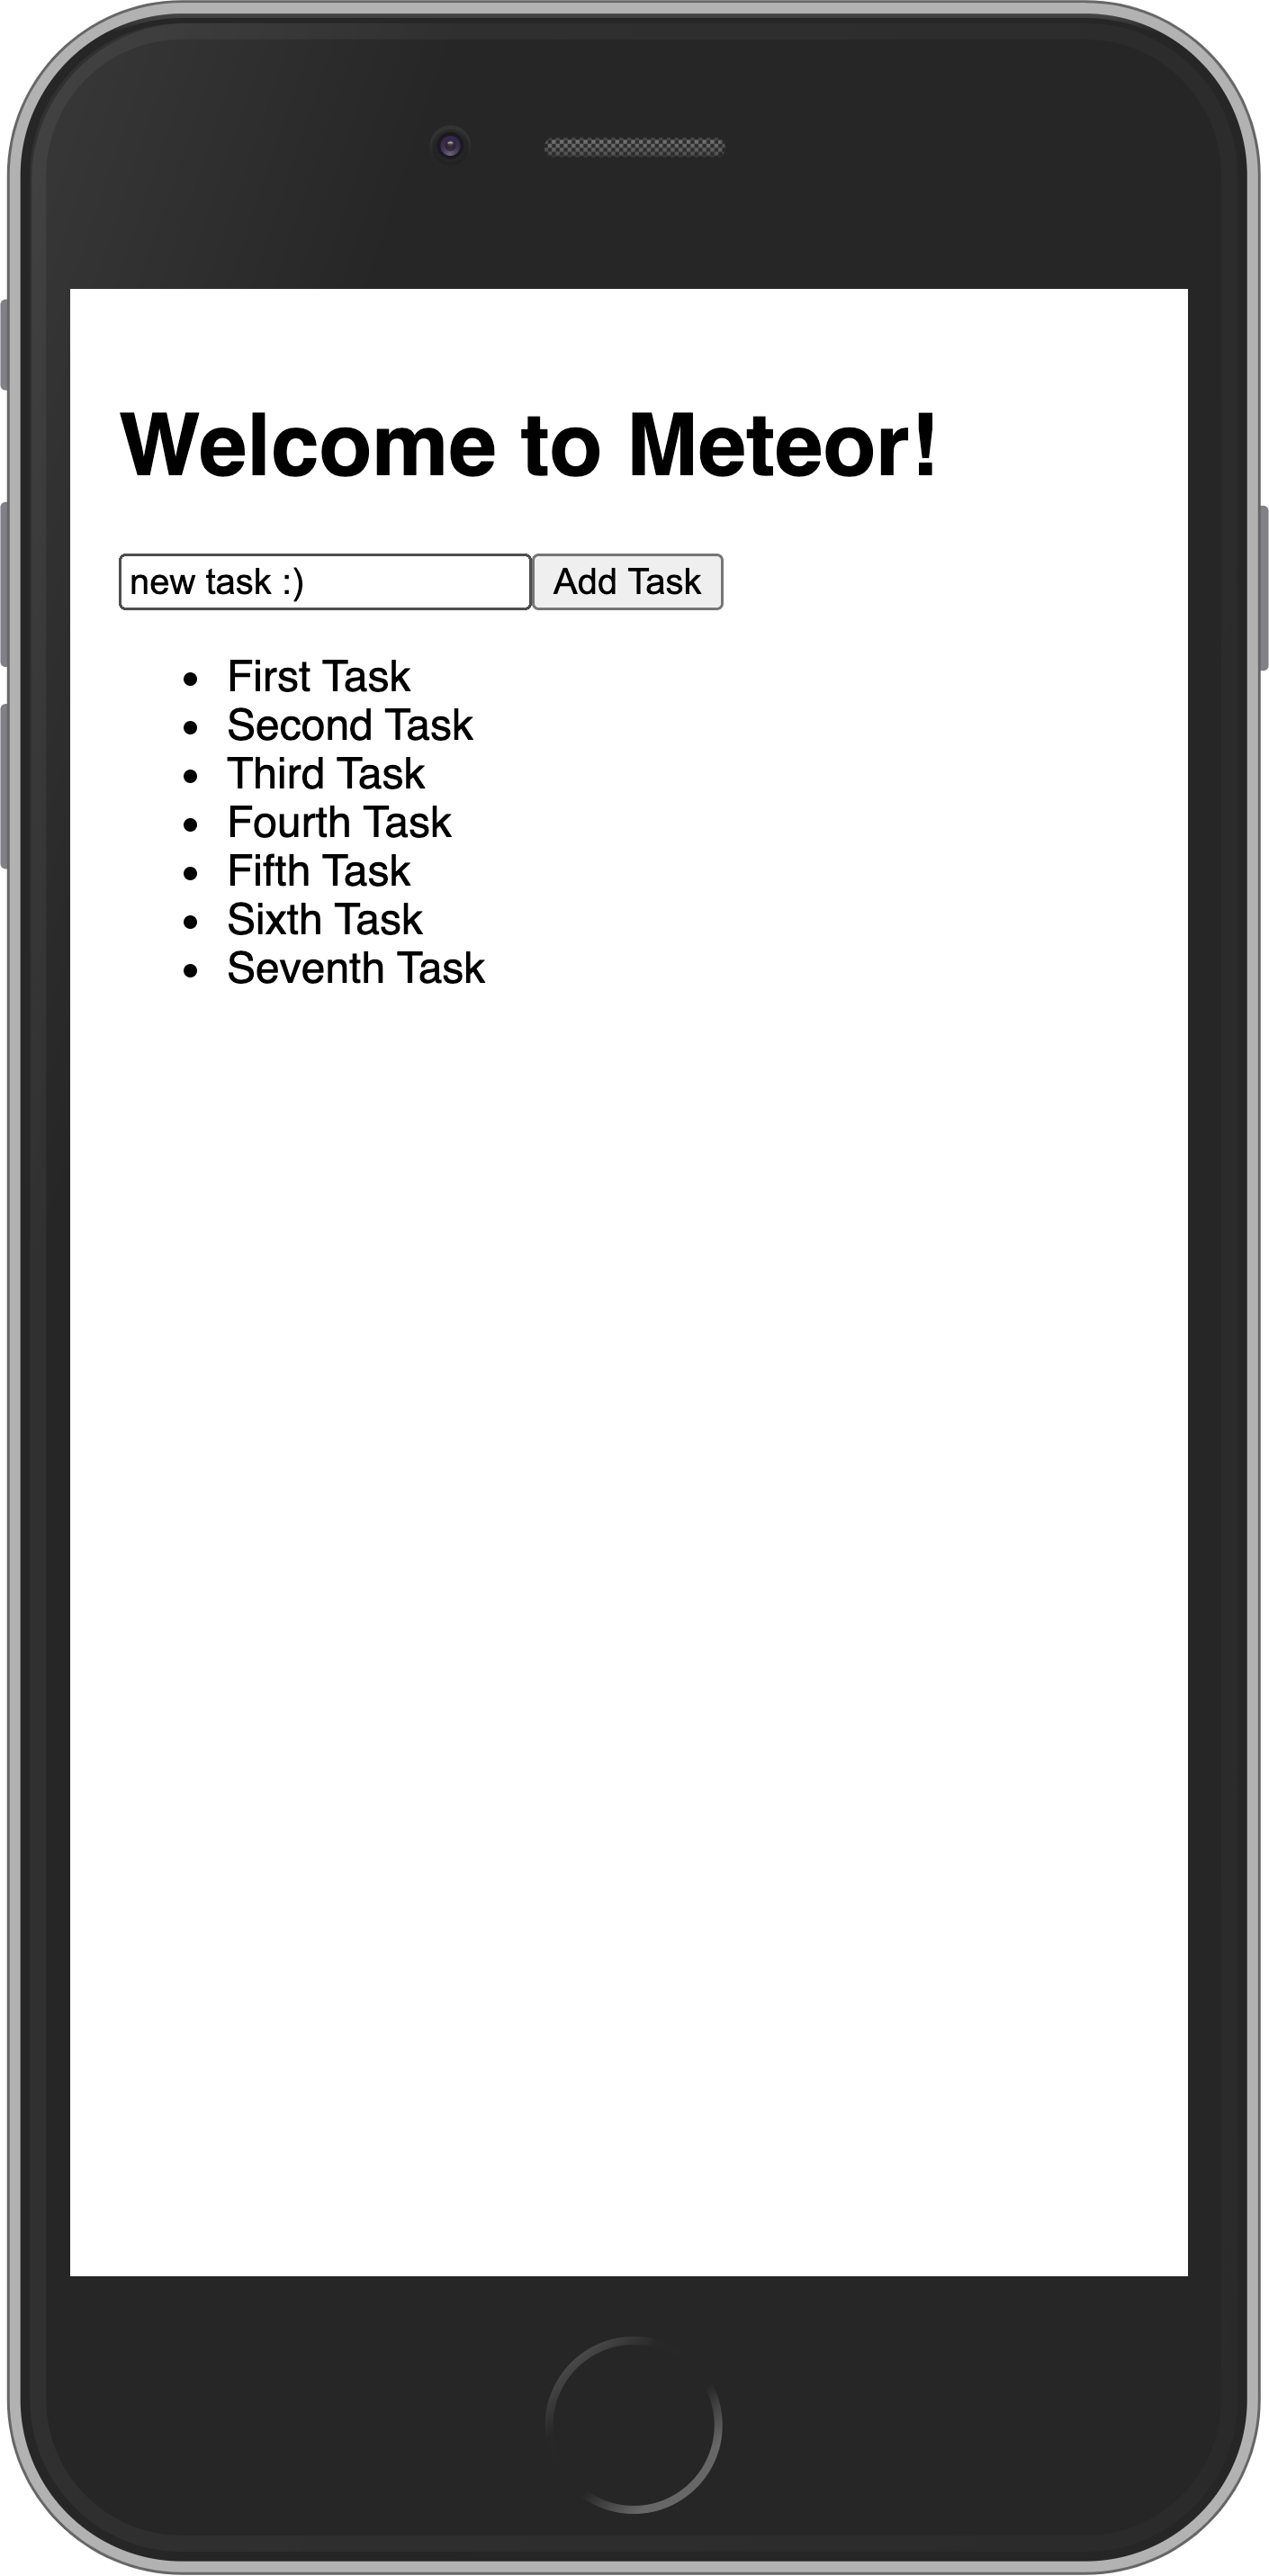
<!-- markup remains the same -->Your app should look like this:
In the next step, we are going to update your tasks state and provide a way for users to remove tasks.
4: Update and Remove
Up until now, you have only inserted documents into our collection. Let's take a look at how you can update and remove them by interacting with the user interface.
4.1: Add Checkbox
First, you need to add a checkbox element to your Task component.
Next, let’s create a new file for our task template in imports/ui/Task.svelte, so we can start to separate the logic in our app.
<script>
  import { Meteor } from "meteor/meteor";
  import "/imports/api/TasksMethods"; // Import for optimistic UI

  export let task;

  async function toggleChecked() {
    await Meteor.callAsync("tasks.toggleChecked", { _id: task._id, isChecked: task.isChecked });
  }
</script>

<li>
  <label>
    <input type="checkbox" checked={task.isChecked} on:change={toggleChecked} />
    <span>{task.text}</span>
  </label>
</li>
Now, update App.svelte to import and use the Task component in the {#each} loop. Remove the old <li> markup.
<script>
import { Meteor } from "meteor/meteor";
import { Tracker } from "meteor/tracker";
import { onMount, onDestroy } from "svelte";
import { TasksCollection } from "../api/TasksCollection";
import "/imports/api/TasksMethods";
import Task from "./Task.svelte";
let newTask = '';
async function addTask(event) {
event.preventDefault();
if (newTask.trim()) {
await Meteor.callAsync("tasks.insert", {
text: newTask,
createdAt: new Date(),
});
newTask = '';
}
}
// Reactive state
let handle;
let subIsReady = false;
let tasks = [];
let computation;
onMount(() => {
handle = Meteor.subscribe("tasks");
computation = Tracker.autorun(() => {
subIsReady = handle.ready();
tasks = TasksCollection.find({}, { sort: { createdAt: -1 } }).fetch();
});
return () => {
computation?.stop?.();
handle?.stop?.();
};
});
onDestroy(() => {
computation?.stop?.();
handle?.stop?.();
});
</script>
<div class="container">
<header>
<h1>Todo List</h1>
</header>
<form class="task-form" on:submit={addTask}>
<input type="text" placeholder="Type to add new tasks" bind:value={newTask} />
<button type="submit">Add Task</button>
</form>
<ul>
{#if subIsReady}
{#each tasks as task (task._id)}
<Task {task} /> <!-- // -->
{/each}
{:else}
<div>Loading ...</div>
{/if}
</ul>
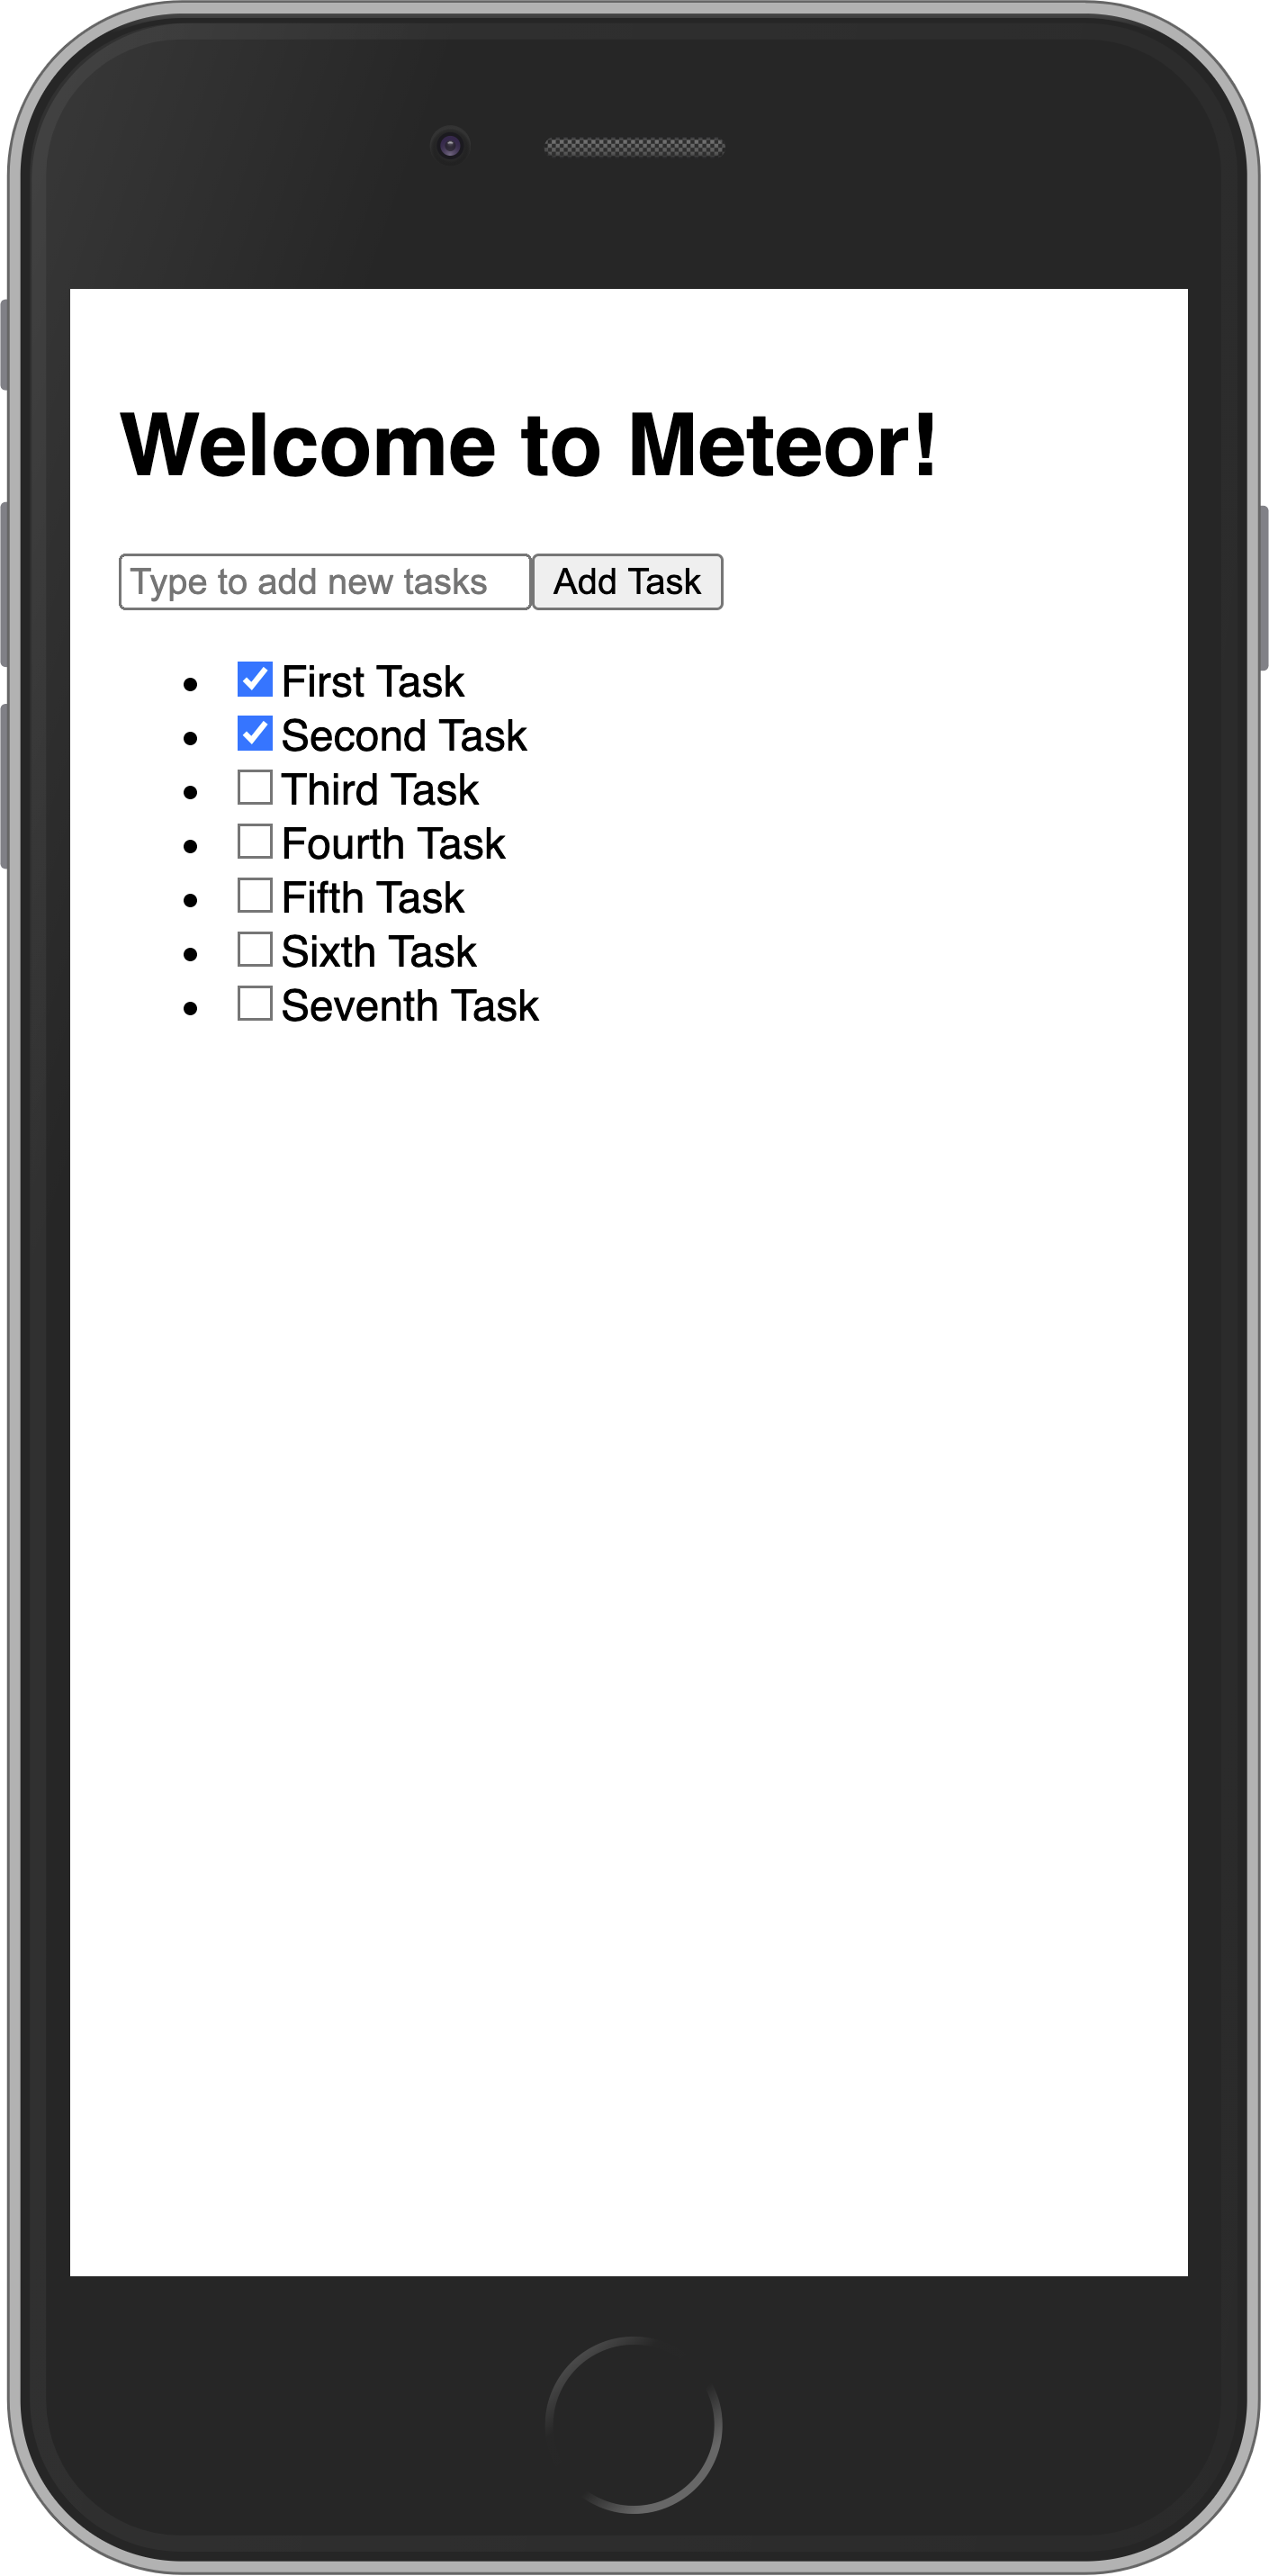
</div>4.2: Toggle Checkbox
Now you can update your task document by toggling its isChecked field.
First, create a new method called tasks.toggleChecked to update the isChecked property.
import { Meteor } from "meteor/meteor";
import { TasksCollection } from "./TasksCollection";

Meteor.methods({
  ...
  "tasks.toggleChecked"({ _id, isChecked }) {
    return TasksCollection.updateAsync(_id, {
      $set: { isChecked: !isChecked },
    });
  },
});
In Task.svelte (as shown above), we've added an on:change handler that calls the method to toggle the checked state.
Toggling checkboxes should now persist in the DB even if you refresh the web browser.
Your app should look like this:
If your computer is fast enough, it's possible that when it sets up the default tasks a few will have the same date. That will cause them to non-deterministically "jump around" in the UI as you toggle checkboxes and the UI reactively updates. To make it stable, you can add a secondary sort on the _id of the task:
<script>
// ... other code
// Update the Tracker.autorun to include sorting by both createdAt and _id
onMount(() => {
handle = Meteor.subscribe("tasks");
computation = Tracker.autorun(() => {
subIsReady = handle.ready();
tasks = TasksCollection.find({}, { sort: { createdAt: -1, _id: -1 } }).fetch();
});
// ... rest of onMount remains the same
});
</script>
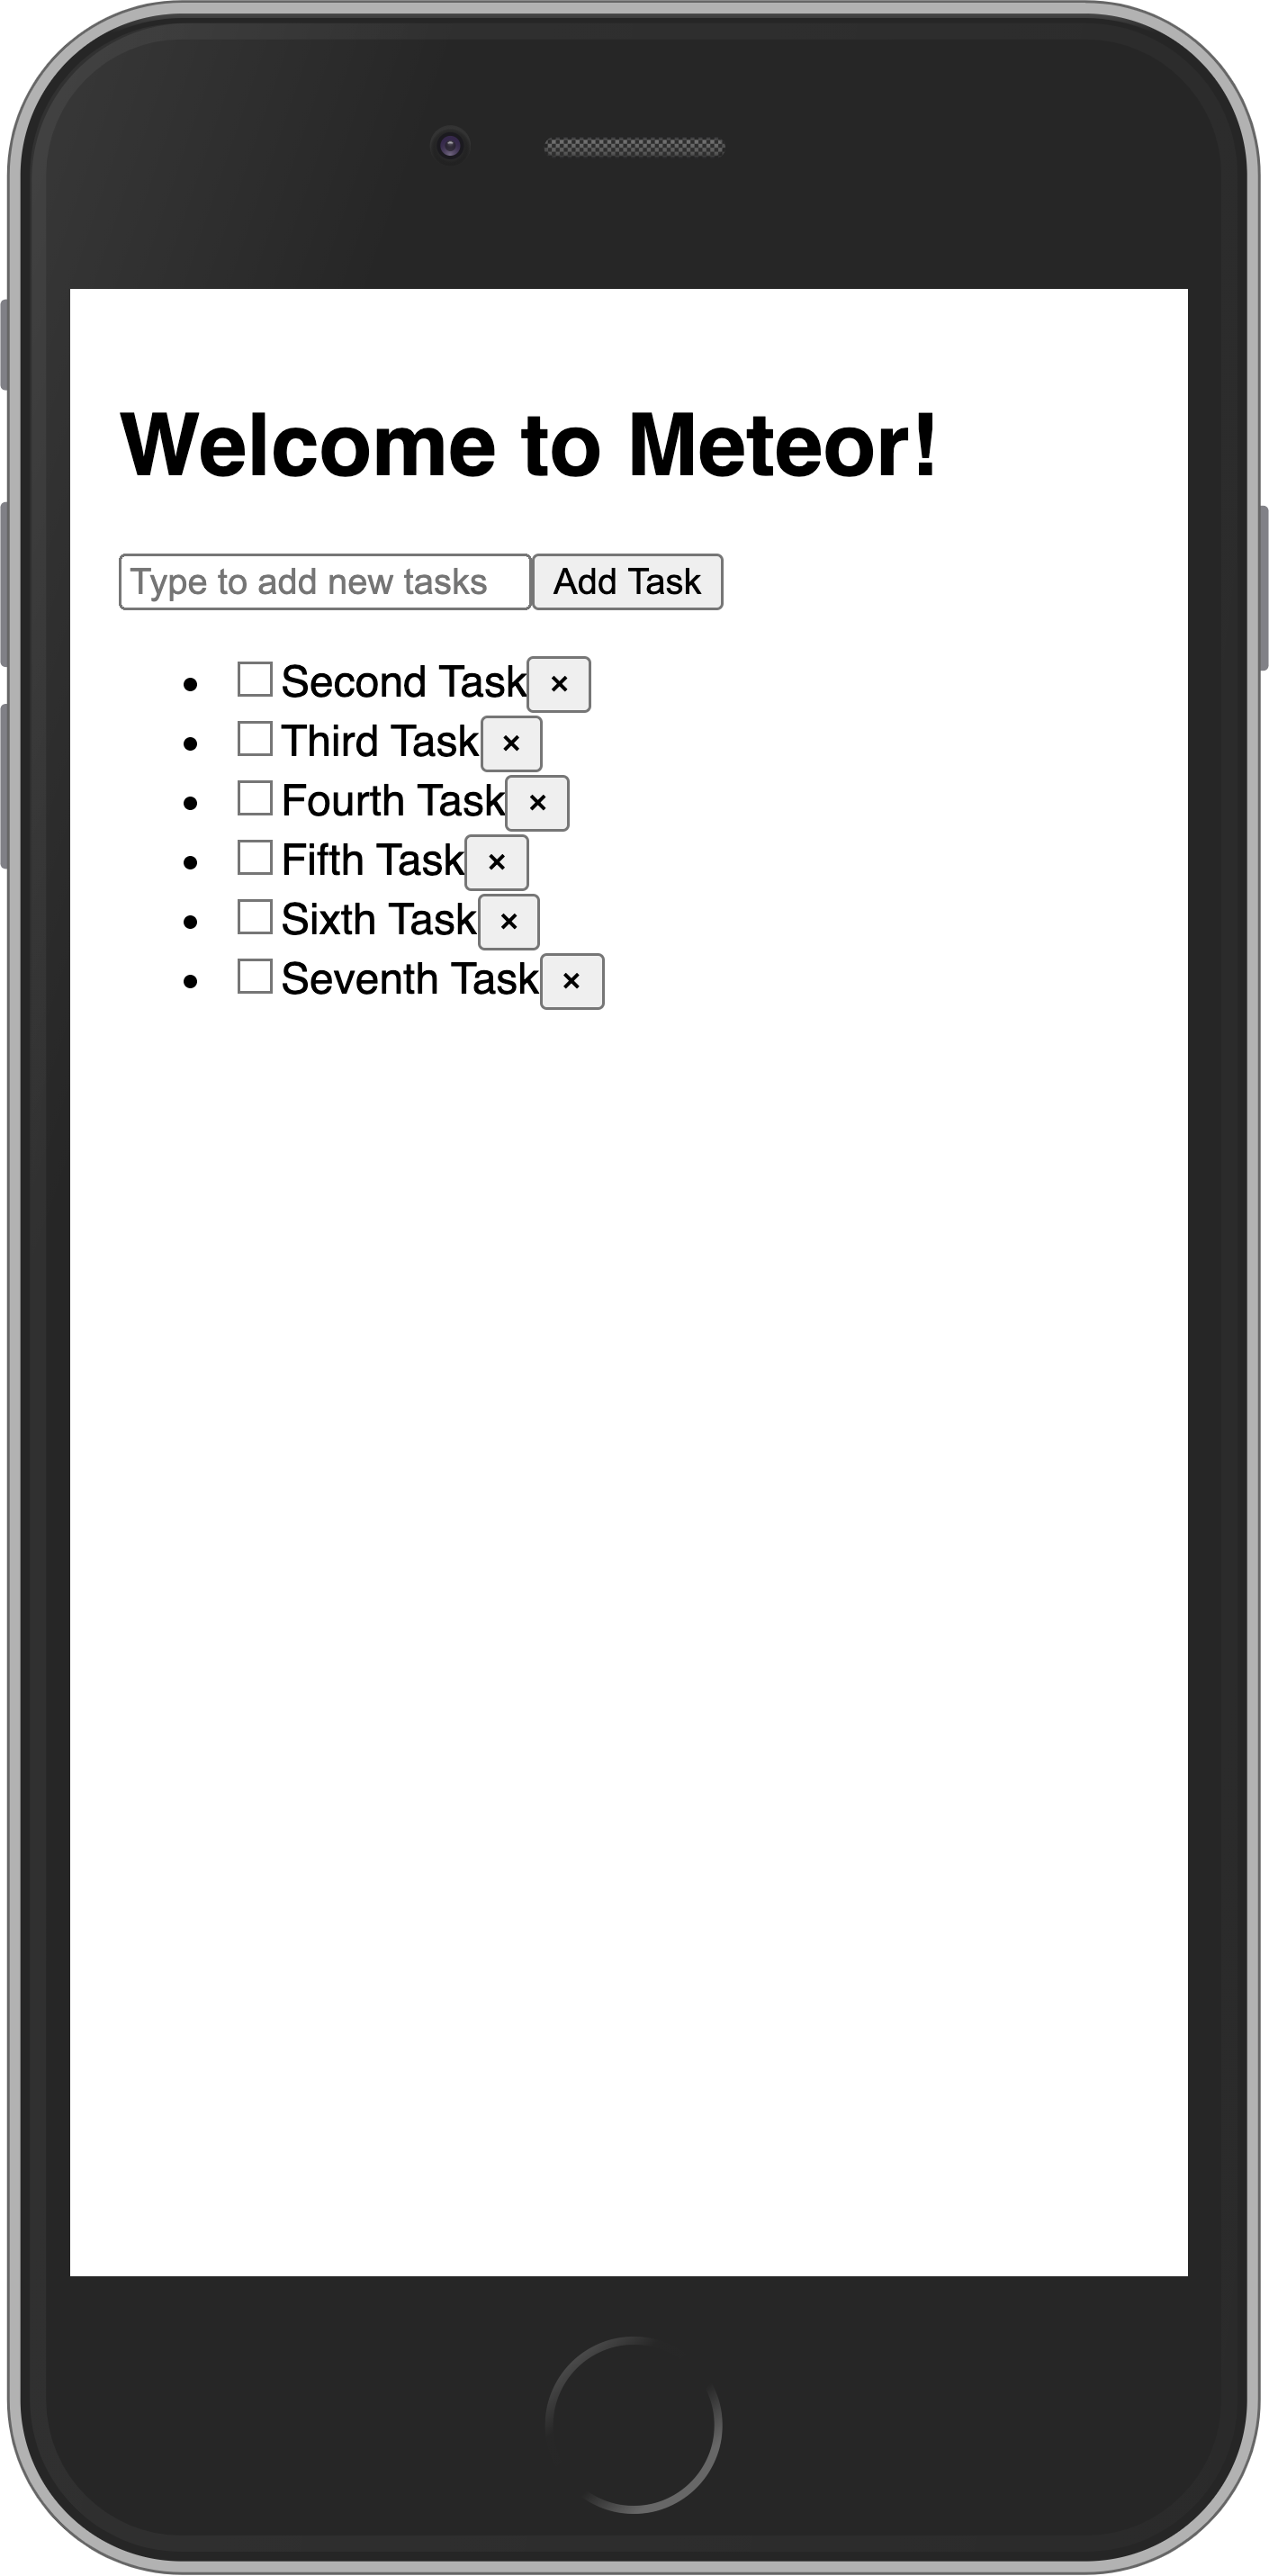
<!-- markup remains the same -->4.3: Remove tasks
You can remove tasks with just a few lines of code.
First, add a button after the label in your Task component and a deleteTask function between the script tags.
<script>
import { Meteor } from "meteor/meteor";
import "/imports/api/TasksMethods";
export let task;
async function toggleChecked() {
await Meteor.callAsync("tasks.toggleChecked", { _id: task._id, isChecked: task.isChecked });
}
async function deleteTask() {
await Meteor.callAsync("tasks.delete", { _id: task._id });
}
</script>
<li>
<label>
<input type="checkbox" checked={task.isChecked} on:change={toggleChecked} />
<span>{task.text}</span>
</label>
<button class="delete" on:click={deleteTask}>×</button> <!-- // -->
</li>Next you need to have a function to delete the task. For that, let's create a new method called tasks.delete:
import { Meteor } from "meteor/meteor";
import { TasksCollection } from "./TasksCollection";

Meteor.methods({
  ...
  "tasks.delete"({ _id }) {
    return TasksCollection.removeAsync(_id);
  },
});
Now the removal logic is handled in Task.svelte via the on:click event on the delete button, which calls the Meteor method.
Your app should look like this:
4.4: Getting data in event handlers
In a collection, every inserted document has a unique _id field that can refer to that specific document. Inside the component, the task prop provides access to the task object, including its _id and other fields like isChecked and text. We use these to call Meteor methods for updating or removing the specific task.
In the next step, we are going to improve the look of your app using CSS with Flexbox.
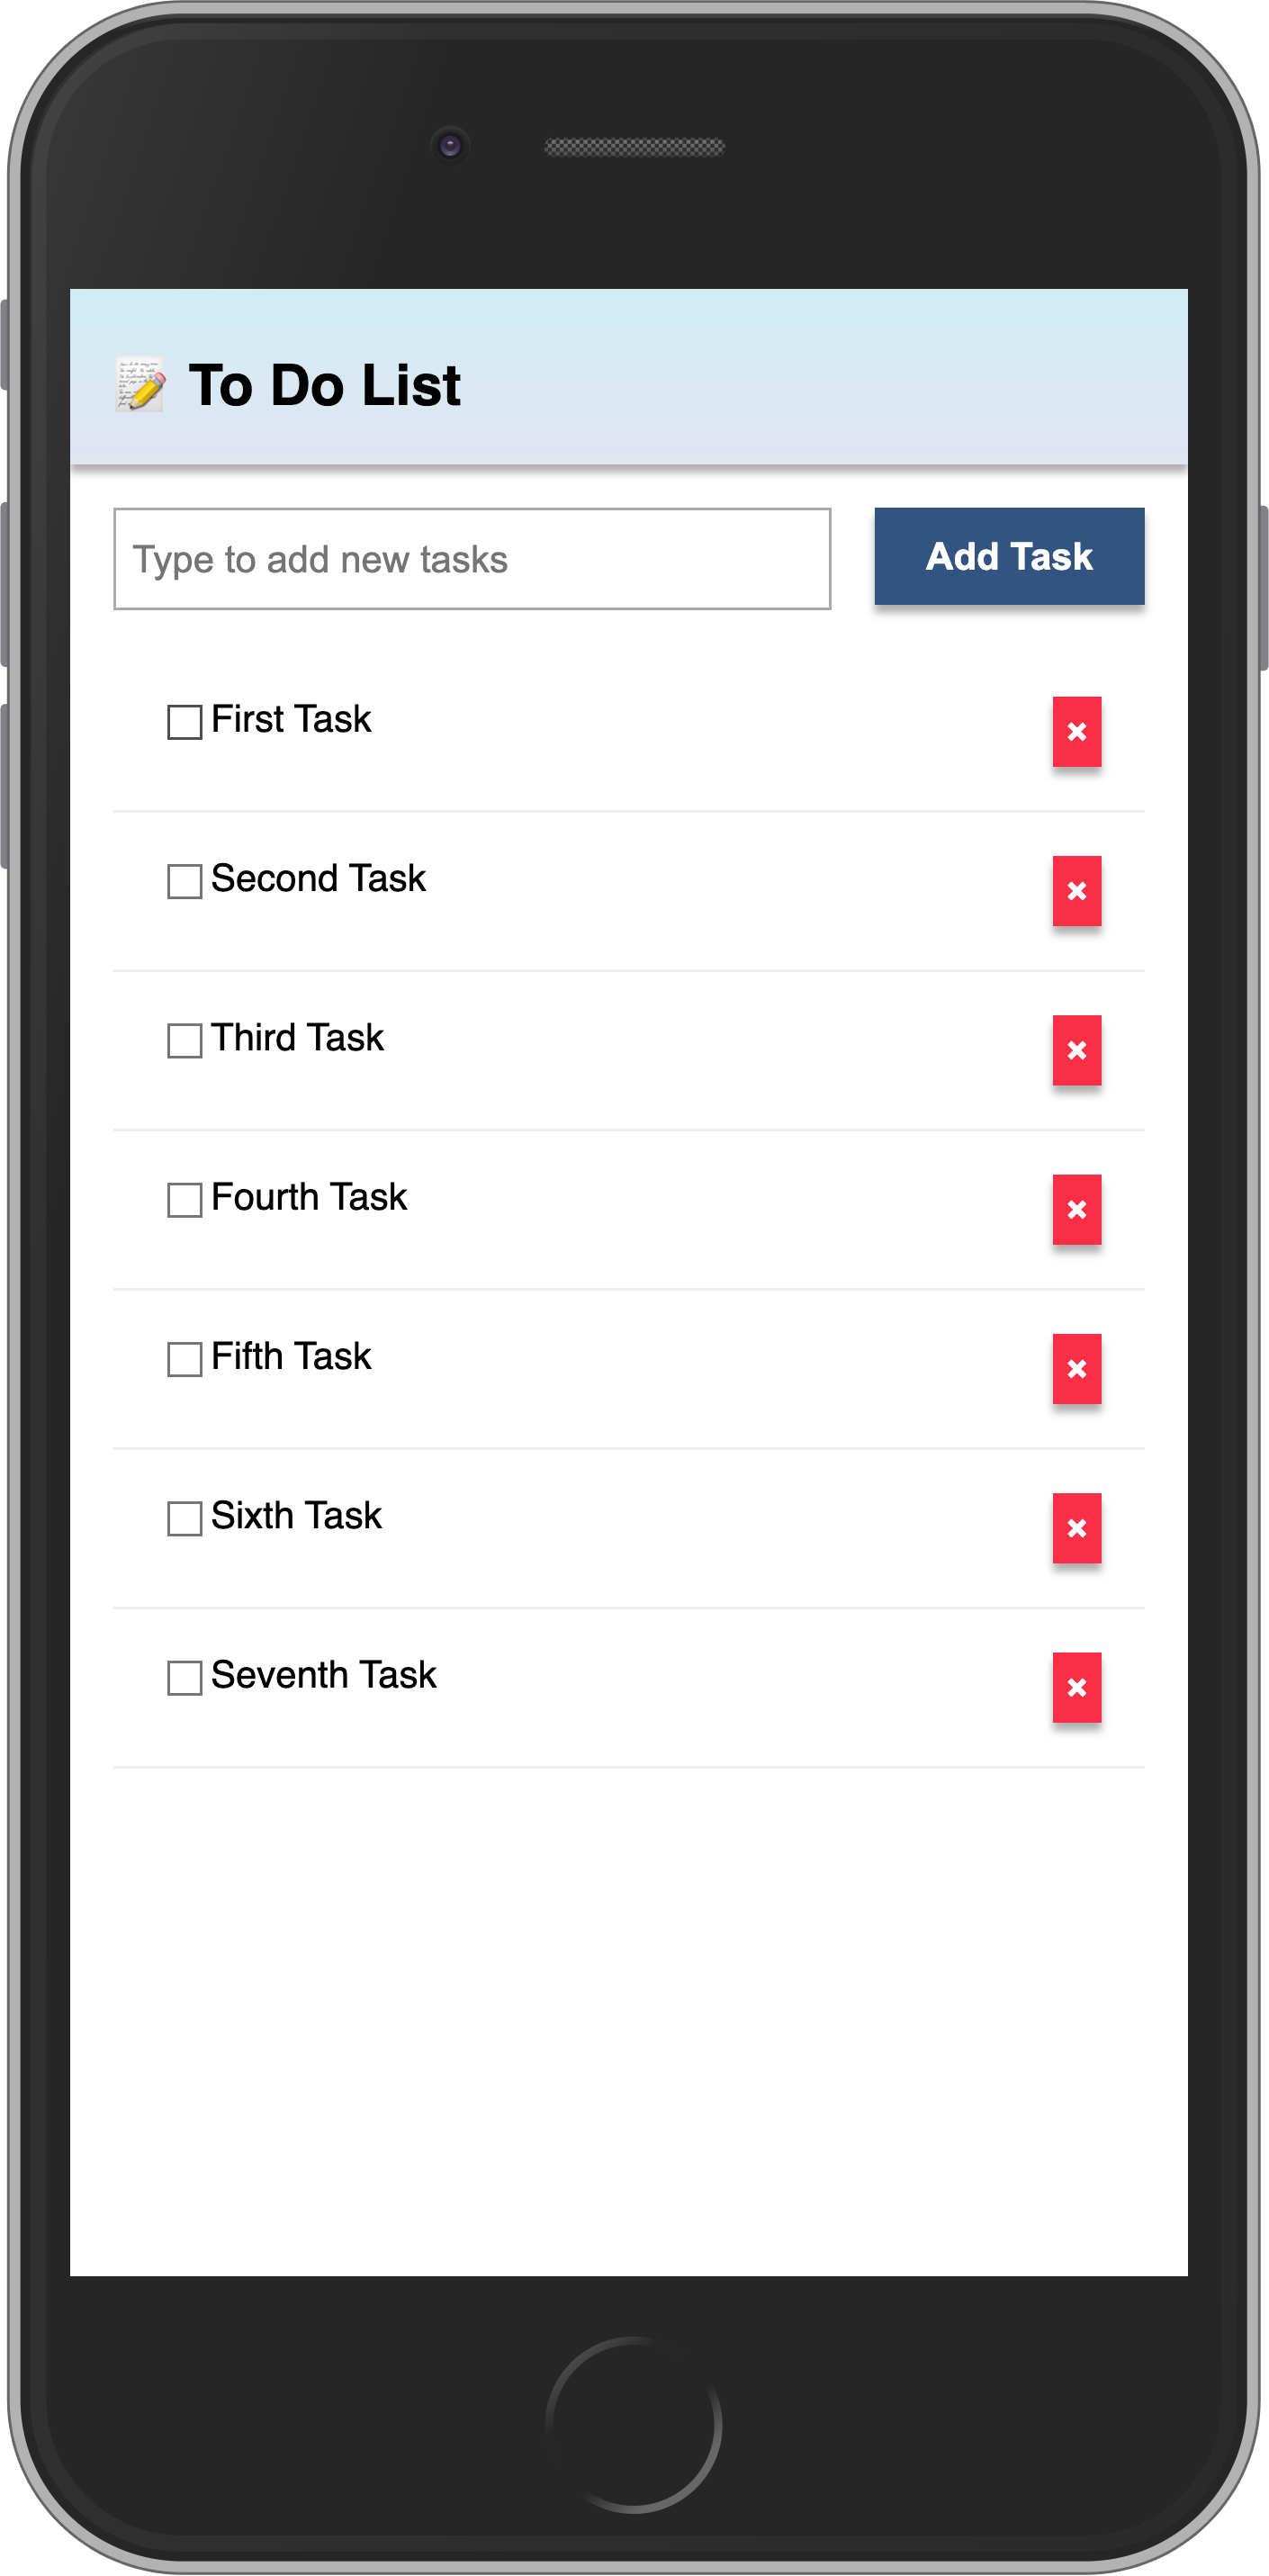
5: Styles
5.1: CSS
Our user interface up until this point has looked quite ugly. Let's add some basic styling which will serve as the foundation for a more professional looking app.
Replace the content of our client/main.css file with the one below, the idea is to have an app bar at the top, and a scrollable content including:
- form to add new tasks;
- list of tasks.
body {
  font-family: sans-serif;
  background-color: #315481;
  background-image: linear-gradient(to bottom, #315481, #918e82 100%);
  background-attachment: fixed;

  position: absolute;
  top: 0;
  bottom: 0;
  left: 0;
  right: 0;

  padding: 0;
  margin: 0;

  font-size: 14px;
}

button {
  font-weight: bold;
  font-size: 1em;
  border: none;
  color: white;
  box-shadow: 0 3px 3px rgba(34, 25, 25, 0.4);
  padding: 5px;
  cursor: pointer;
}

button:focus {
  outline: 0;
}

.app {
  display: flex;
  flex-direction: column;
  height: 100vh;
}

.app-header {
  flex-grow: 1;
  white-space: nowrap;
  overflow: hidden;
  text-overflow: ellipsis;
}

.main {
  display: flex;
  flex-direction: column;
  flex-grow: 1;
  overflow: auto;
  background: white;
}

.main::-webkit-scrollbar {
  width: 0;
  height: 0;
  background: inherit;
}

header {
  background: #d2edf4;
  background-image: linear-gradient(to bottom, #d0edf5, #e1e5f0 100%);
  padding: 20px 15px 15px 15px;
  position: relative;
  box-shadow: 0 3px 3px rgba(34, 25, 25, 0.4);
}

.app-bar {
  display: flex;
  justify-content: space-between;
}

.app-bar h1 {
  font-size: 1.5em;
  margin: 0;
  display: inline-block;
  margin-right: 1em;
}

.task-form {
  display: flex;
  margin: 16px;
}

.task-form > input {
  flex-grow: 1;
  box-sizing: border-box;
  padding: 10px 6px;
  background: transparent;
  border: 1px solid #aaa;
  width: 100%;
  font-size: 1em;
  margin-right: 16px;
}

.task-form > input:focus {
  outline: 0;
}

.task-form > button {
  min-width: 100px;
  height: 95%;
  background-color: #315481;
}

.tasks {
  list-style-type: none;
  padding-inline-start: 0;
  padding-left: 16px;
  padding-right: 16px;
  margin-block-start: 0;
  margin-block-end: 0;
}

.tasks > li {
  display: flex;
  padding: 16px;
  border-bottom: #eee solid 1px;
  align-items: center;
}

.tasks > li > label {
  flex-grow: 1;
}

.tasks > li > button {
  justify-self: flex-end;
  background-color: #ff3046;
}
If you want to learn more about this stylesheet check this article about Flexbox, and also this free video tutorial about it from Wes Bos.
Flexbox is an excellent tool to distribute and align elements in your UI.
5.2: Applying styles
Now you need to add some elements around your components. You are going to add a class to your main div in the App.svelte, also a header element with a few div elements around your h1, and a main div around your form and list. Check below how it should be; pay attention to the name of the classes, they need to be the same as in the CSS file:
<script>
  import { Meteor } from "meteor/meteor";
  import { Tracker } from "meteor/tracker";
  import { onMount, onDestroy } from "svelte";
  import { TasksCollection } from "../api/TasksCollection";
  import "/imports/api/TasksMethods";
  import Task from "./Task.svelte";

  let newTask = '';

  async function addTask(event) {
    event.preventDefault();
    if (newTask.trim()) {
      await Meteor.callAsync("tasks.insert", {
        text: newTask,
        createdAt: new Date(),
      });
      newTask = '';
    }
  }

  // Reactive state
  let handle;
  let subIsReady = false;
  let tasks = [];

  let computation;

  onMount(() => {
    handle = Meteor.subscribe("tasks");

    computation = Tracker.autorun(() => {
      subIsReady = handle.ready();
      tasks = TasksCollection.find({}, { sort: { createdAt: -1, _id: -1 } }).fetch();
    });

    return () => {
      computation?.stop?.();
      handle?.stop?.();
    };
  });

  onDestroy(() => {
    computation?.stop?.();
    handle?.stop?.();
  });
</script>

<div class="app">
  <header>
    <div class="app-bar">
      <div class="app-header">
        <h1>📝️ Todo List</h1>
      </div>
    </div>
  </header>

  <div class="main">
    <form class="task-form" on:submit={addTask}>
      <input type="text" placeholder="Type to add new tasks" bind:value={newTask} />
      <button type="submit">Add Task</button>
    </form>

    <ul class="tasks">
      {#if subIsReady}
        {#each tasks as task (task._id)}
          <Task {task} />
        {/each}
      {:else}
        <div>Loading ...</div>
      {/if}
    </ul>
  </div>
</div>
Your app should look like this:
In the next step, we are going to make this task list more interactive, for example, providing a way to filter tasks.
6: Filter tasks
In this step, you will filter your tasks by status and show the number of pending tasks.
6.1: Reactive State
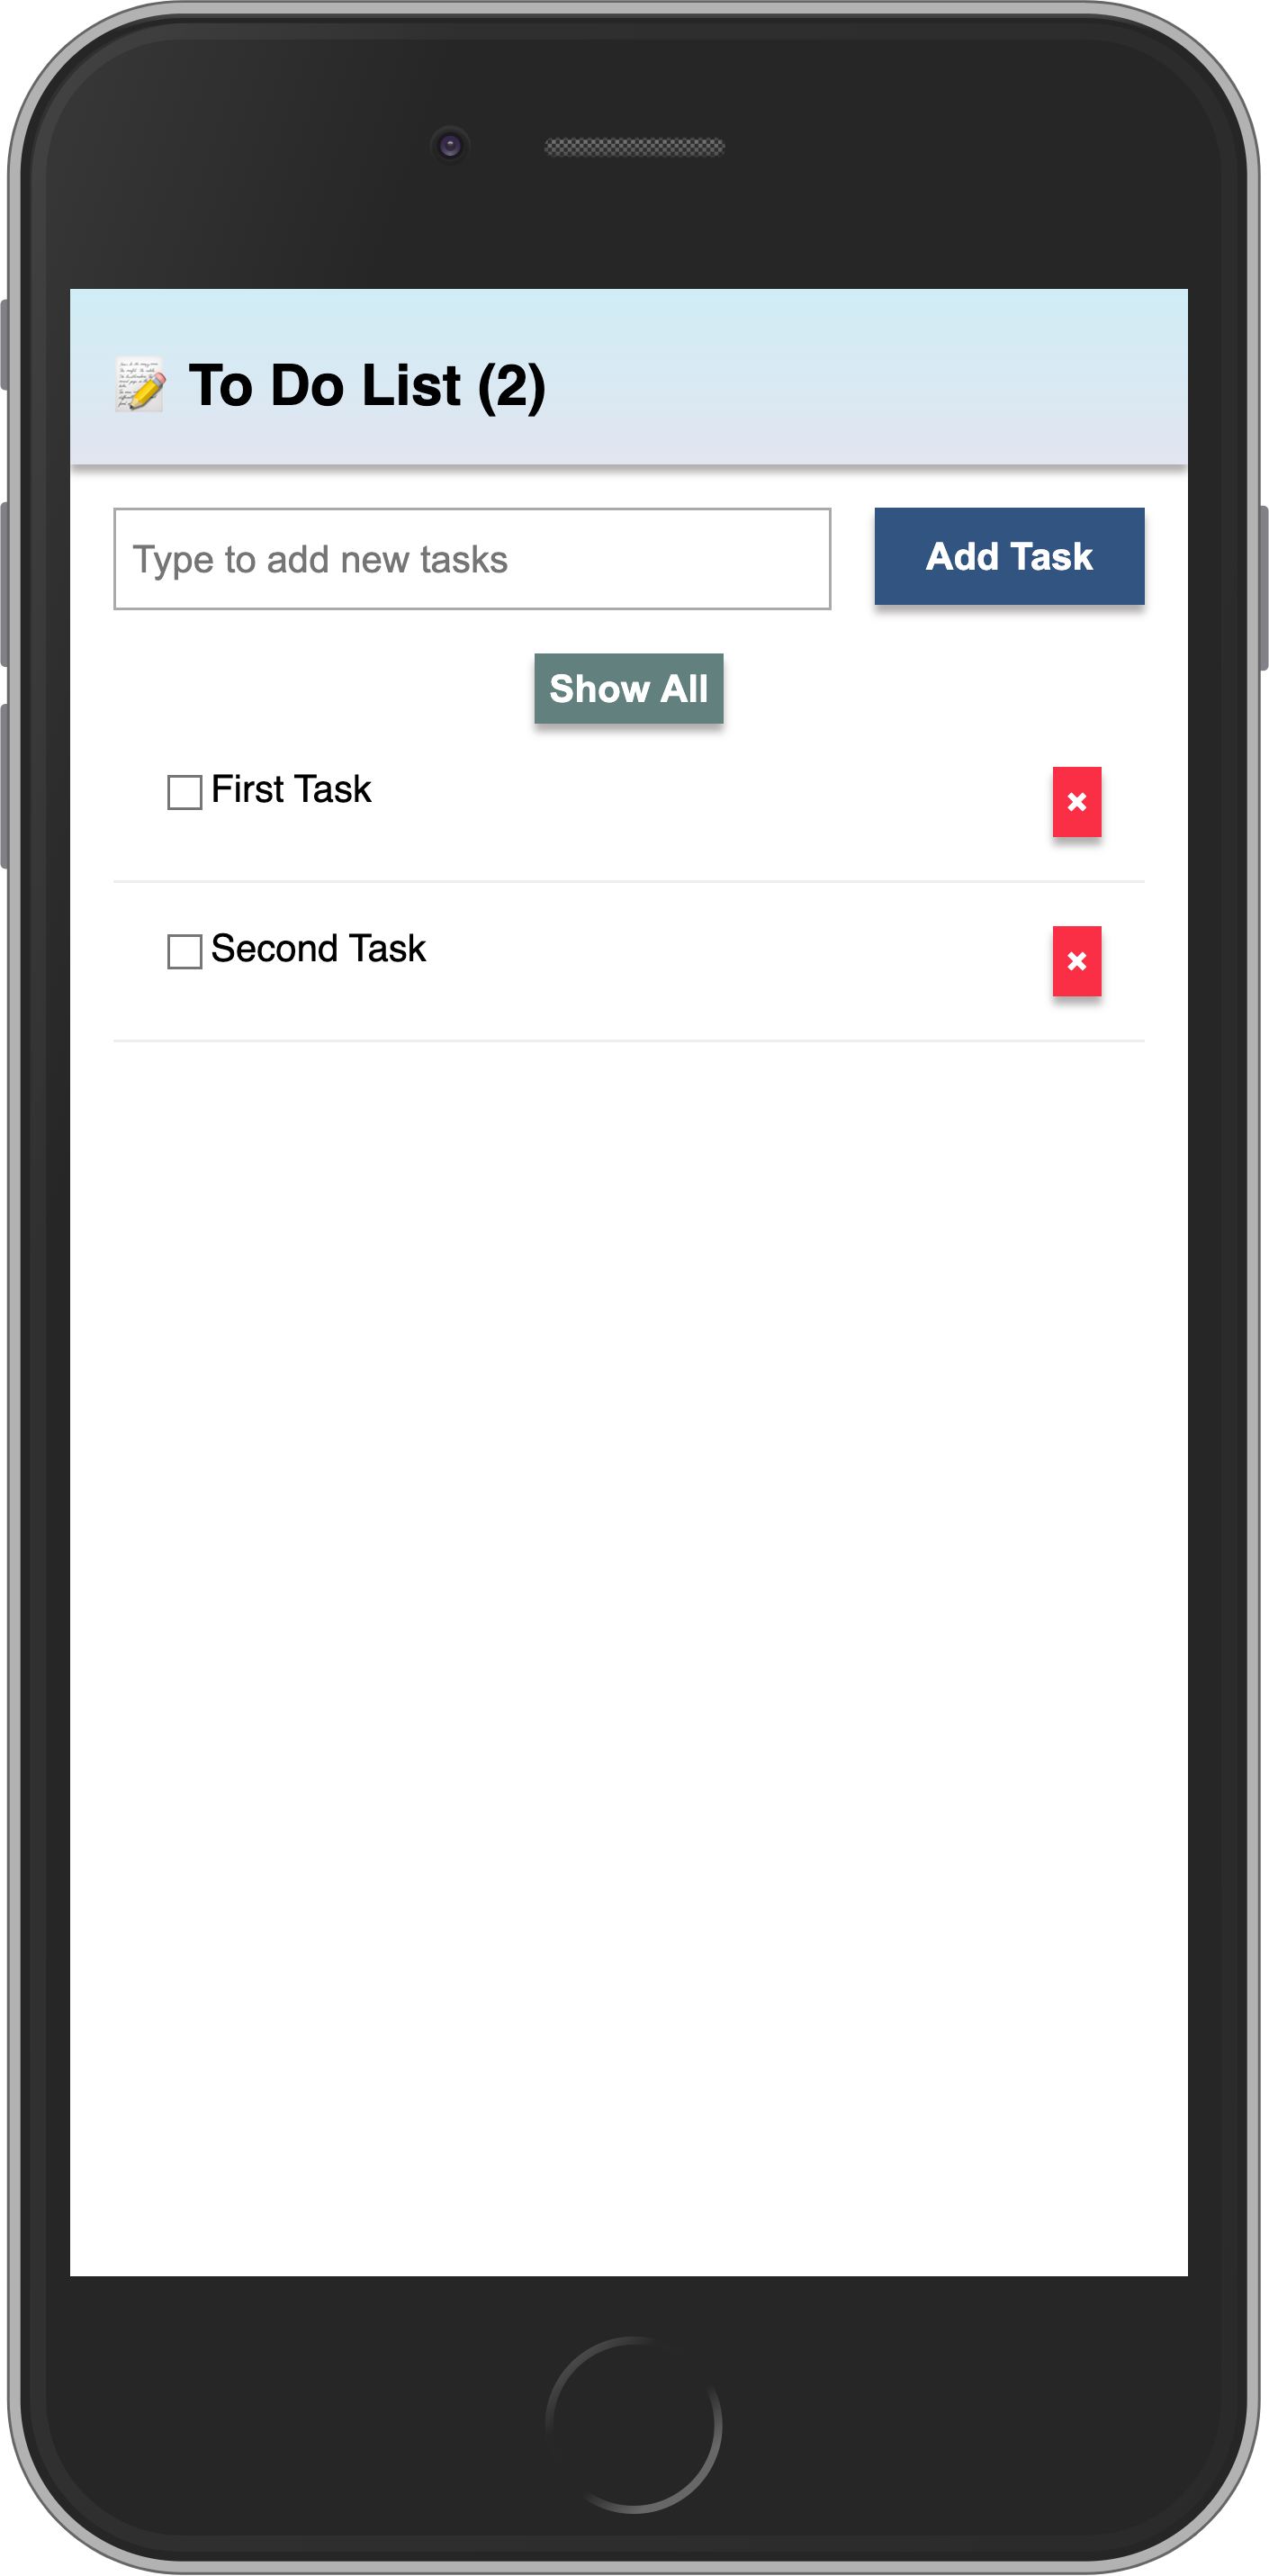
First, you will add a button to show or hide the completed tasks from the list.
In Svelte, we can manage component state using reactive variables directly in the <script> tag. Svelte's reactivity will automatically update the UI when the state changes.
We'll add a hideCompleted variable to the App.svelte component and a function to toggle it.
<script>
  import { Meteor } from "meteor/meteor";
  import { TasksCollection } from "../api/TasksCollection";
  import "/imports/api/TasksMethods";
  import Task from "./Task.svelte";

  let newTask = '';
  let hideCompleted = false;

  async function addTask(event) {
    event.preventDefault();
    if (newTask.trim()) {
      await Meteor.callAsync("tasks.insert", {
        text: newTask,
        createdAt: new Date(),
      });
      newTask = '';
    }
  }

  function toggleHideCompleted() {
    hideCompleted = !hideCompleted;
  }

  // Reactive state
  let handle;
  let subIsReady = false;
  let tasks = [];

  let computation;

  onMount(() => {
    handle = Meteor.subscribe("tasks");

    computation = Tracker.autorun(() => {
      subIsReady = handle.ready();
      tasks = TasksCollection.find({}, { sort: { createdAt: -1, _id: -1 } }).fetch();
    });

    return () => {
      computation?.stop?.();
      handle?.stop?.();
    };
  });

  onDestroy(() => {
    computation?.stop?.();
    handle?.stop?.();
  });
</script>

<!-- markup will be updated in next steps -->
Then, add the button in the markup to toggle the state:
<!-- ... script remains the same -->

<div class="app">
  <header>
    <div class="app-bar">
      <div class="app-header">
        <h1>📝️ Todo List</h1>
      </div>
    </div>
  </header>

  <div class="main">
    <form class="task-form" on:submit={addTask}>
      <input type="text" placeholder="Type to add new tasks" bind:value={newTask} />
      <button type="submit">Add Task</button>
    </form>

    <div class="filter"> <!-- // -->
      <button on:click={toggleHideCompleted}> <!-- // -->
        {#if hideCompleted} <!-- // -->
          Show All <!-- // -->
        {:else} <!-- // -->
          Hide Completed <!-- // -->
        {/if} <!-- // -->
      </button> <!-- // -->
    </div> <!-- // -->

    <ul class="tasks">
      {#if subIsReady}
        {#each tasks as task (task._id)}
          <Task {task} />
        {/each}
      {:else}
        <div>Loading ...</div>
      {/if}
    </ul>
  </div>
</div>
You may notice we’re using {#if} (a conditional block) for the button text. You can learn more about Svelte's conditional rendering here.
6.2: Button style
You should add some style to your button so it does not look gray and without a good contrast. You can use the styles below as a reference:
.filter {
  display: flex;
  justify-content: center;
}

.filter > button {
  background-color: #62807e;
}
6.3: Filter Tasks
Now, update the reactive tasks fetch to apply the filter if hideCompleted is true. We'll also add a reactive variable for the incomplete count.
<script>
  import { Meteor } from "meteor/meteor";
  import { Tracker } from "meteor/tracker";
  import { onMount, onDestroy } from "svelte";
  import { TasksCollection } from "../api/TasksCollection";
  import "/imports/api/TasksMethods";
  import Task from "./Task.svelte";

  let newTask = '';
  let hideCompleted = false;

  async function addTask(event) {
    event.preventDefault();
    if (newTask.trim()) {
      await Meteor.callAsync("tasks.insert", {
        text: newTask,
        createdAt: new Date(),
      });
      newTask = '';
    }
  }

  function toggleHideCompleted() {
    hideCompleted = !hideCompleted;
  }

  // Reactive state
  let handle;
  let subIsReady = false;
  let tasks = [];
  let incompleteCount = 0;

  let computation;

  $: incompleteDisplay = incompleteCount > 0 ? `(${incompleteCount})` : '';

  onMount(() => {
    handle = Meteor.subscribe("tasks");

    computation = Tracker.autorun(() => {
      subIsReady = handle.ready();

      // Reactive tasks with filter
      tasks = TasksCollection.find(
        hideCompleted ? { isChecked: { $ne: true } } : {},
        { sort: { createdAt: -1, _id: -1 } }
      ).fetch();

      // Reactive incomplete count
      incompleteCount = TasksCollection.find({ isChecked: { $ne: true } }).count();
    });

    return () => {
      computation?.stop?.();
      handle?.stop?.();
    };
  });

  onDestroy(() => {
    computation?.stop?.();
    handle?.stop?.();
  });
</script>

<!-- markup remains the same -->
6.4: Meteor Dev Tools Extension
You can install an extension to visualize the data in your Mini Mongo.
Meteor DevTools Evolved will help you to debug your app as you can see what data is on Mini Mongo.
You can also see all the messages that Meteor is sending and receiving from the server, this is useful for you to learn more about how Meteor works.

Install it in your Google Chrome browser using this link.
6.5: Pending tasks
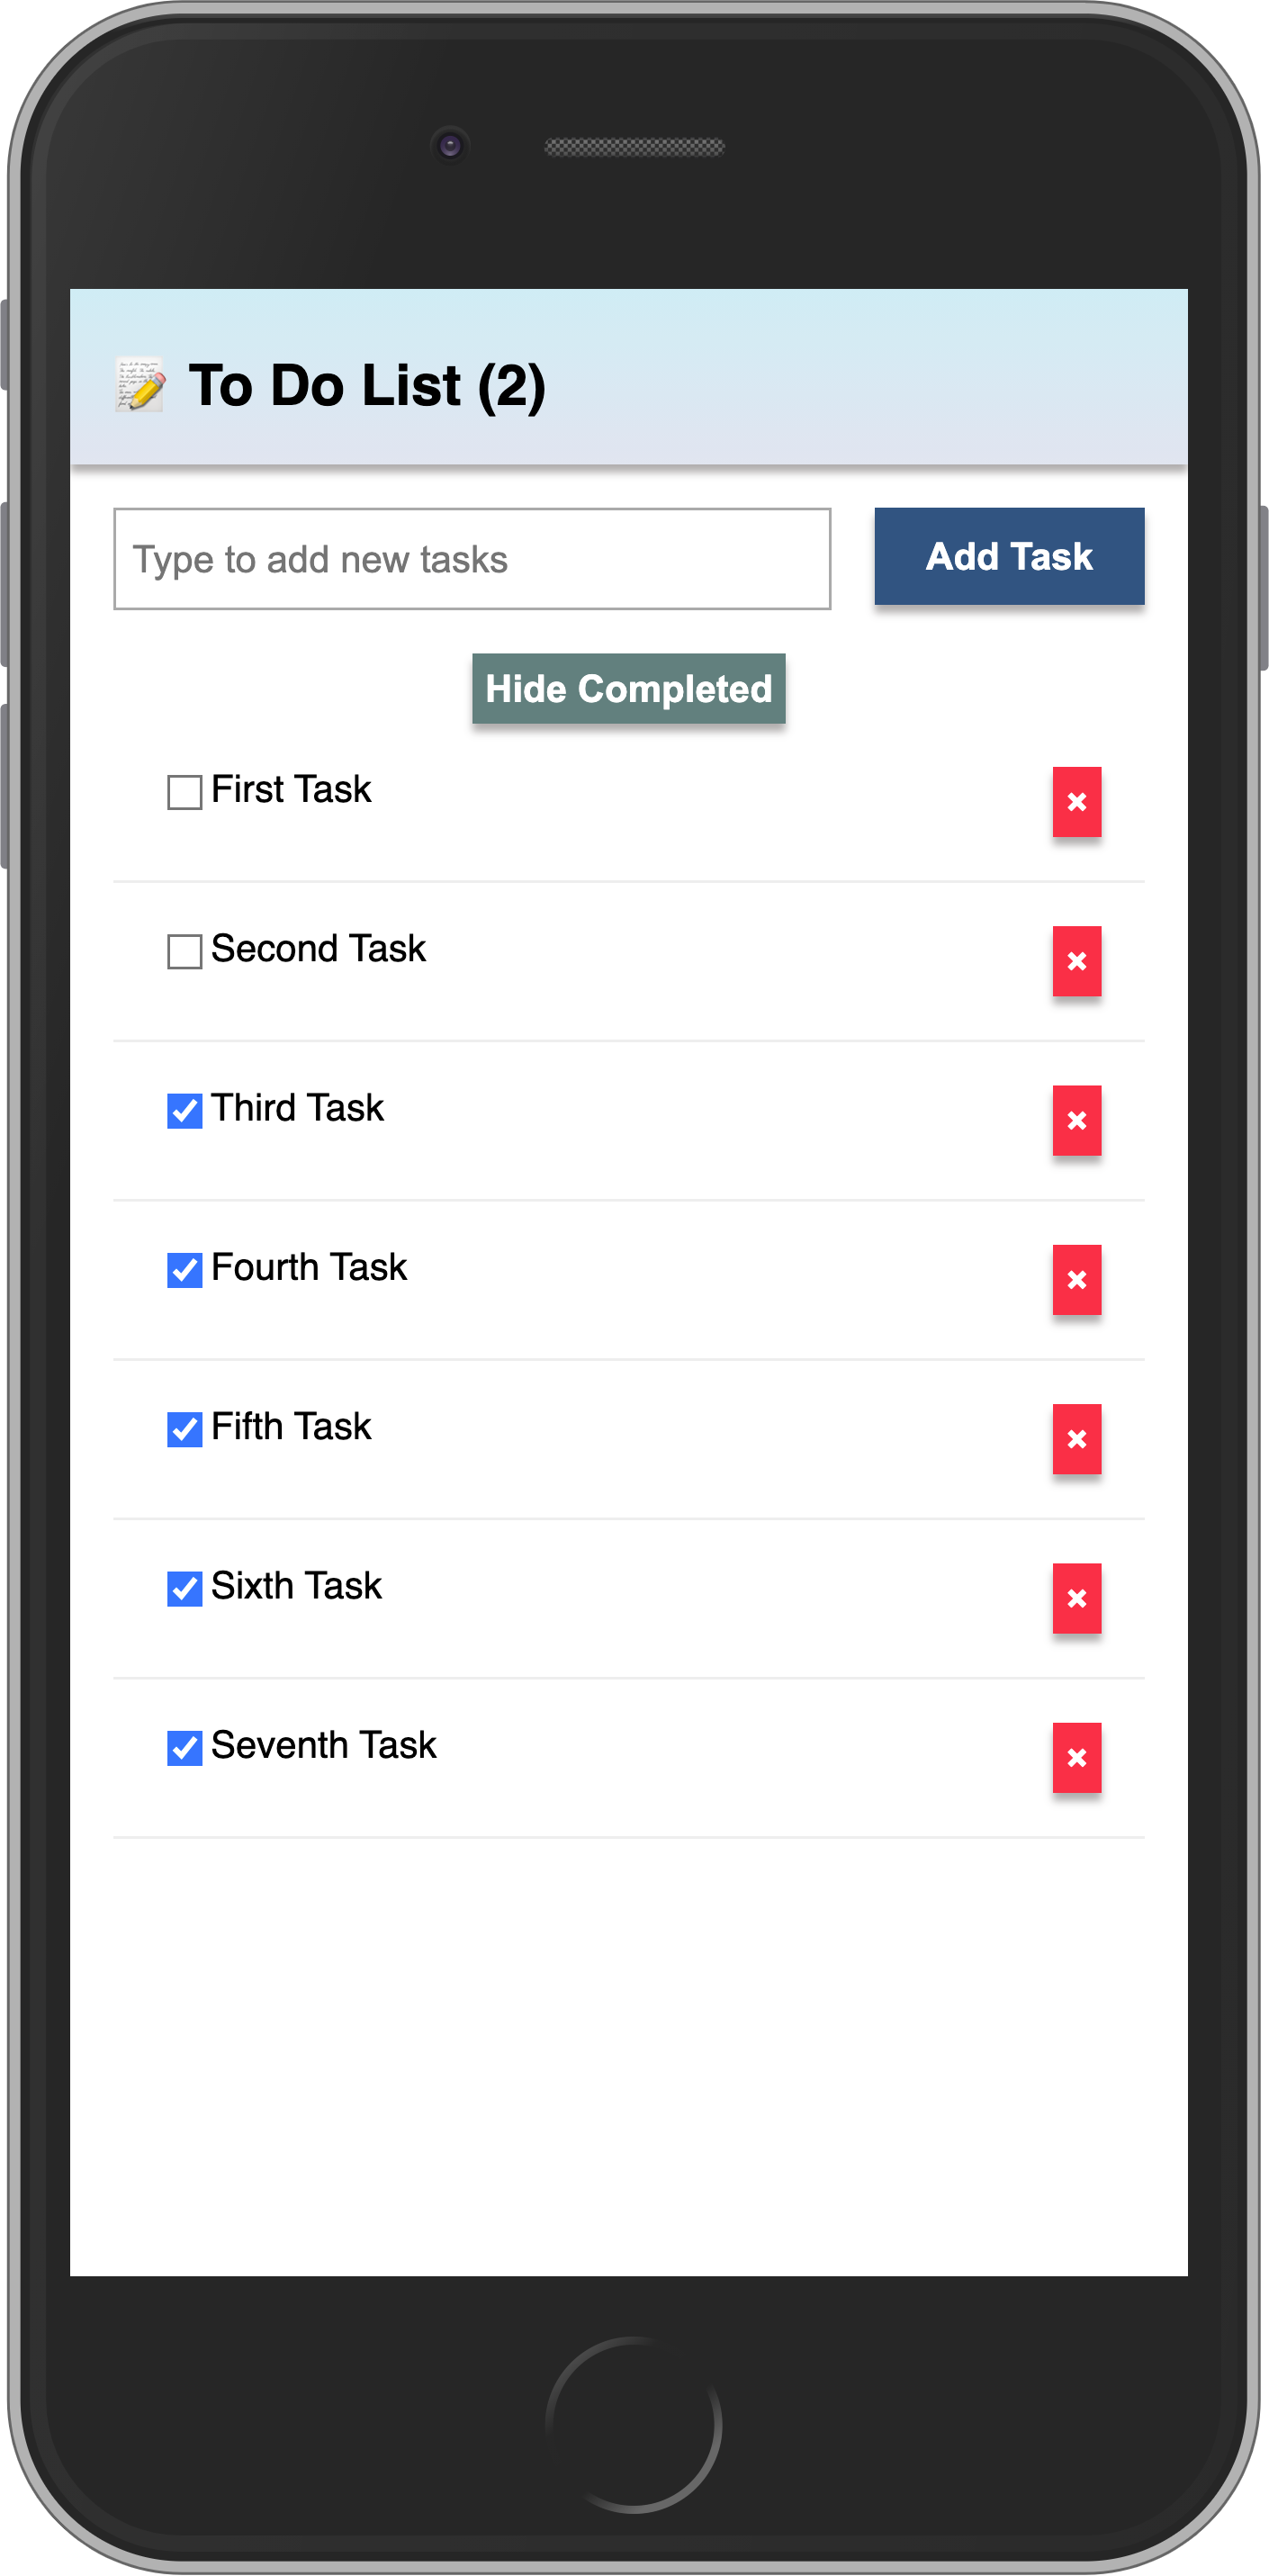
Update the App component in order to show the number of pending tasks in the app bar.
You should avoid adding zero to your app bar when there are no pending tasks. Use the reactive incompleteDisplay in the header:
<!-- ... script with incompleteDisplay remains the same -->
<div class="app">
<header>
<div class="app-bar">
<div class="app-header">
<h1>📝️ To Do List {incompleteDisplay}</h1> <!-- // -->
</div>
</div>
</header>
<!-- rest of markup -->
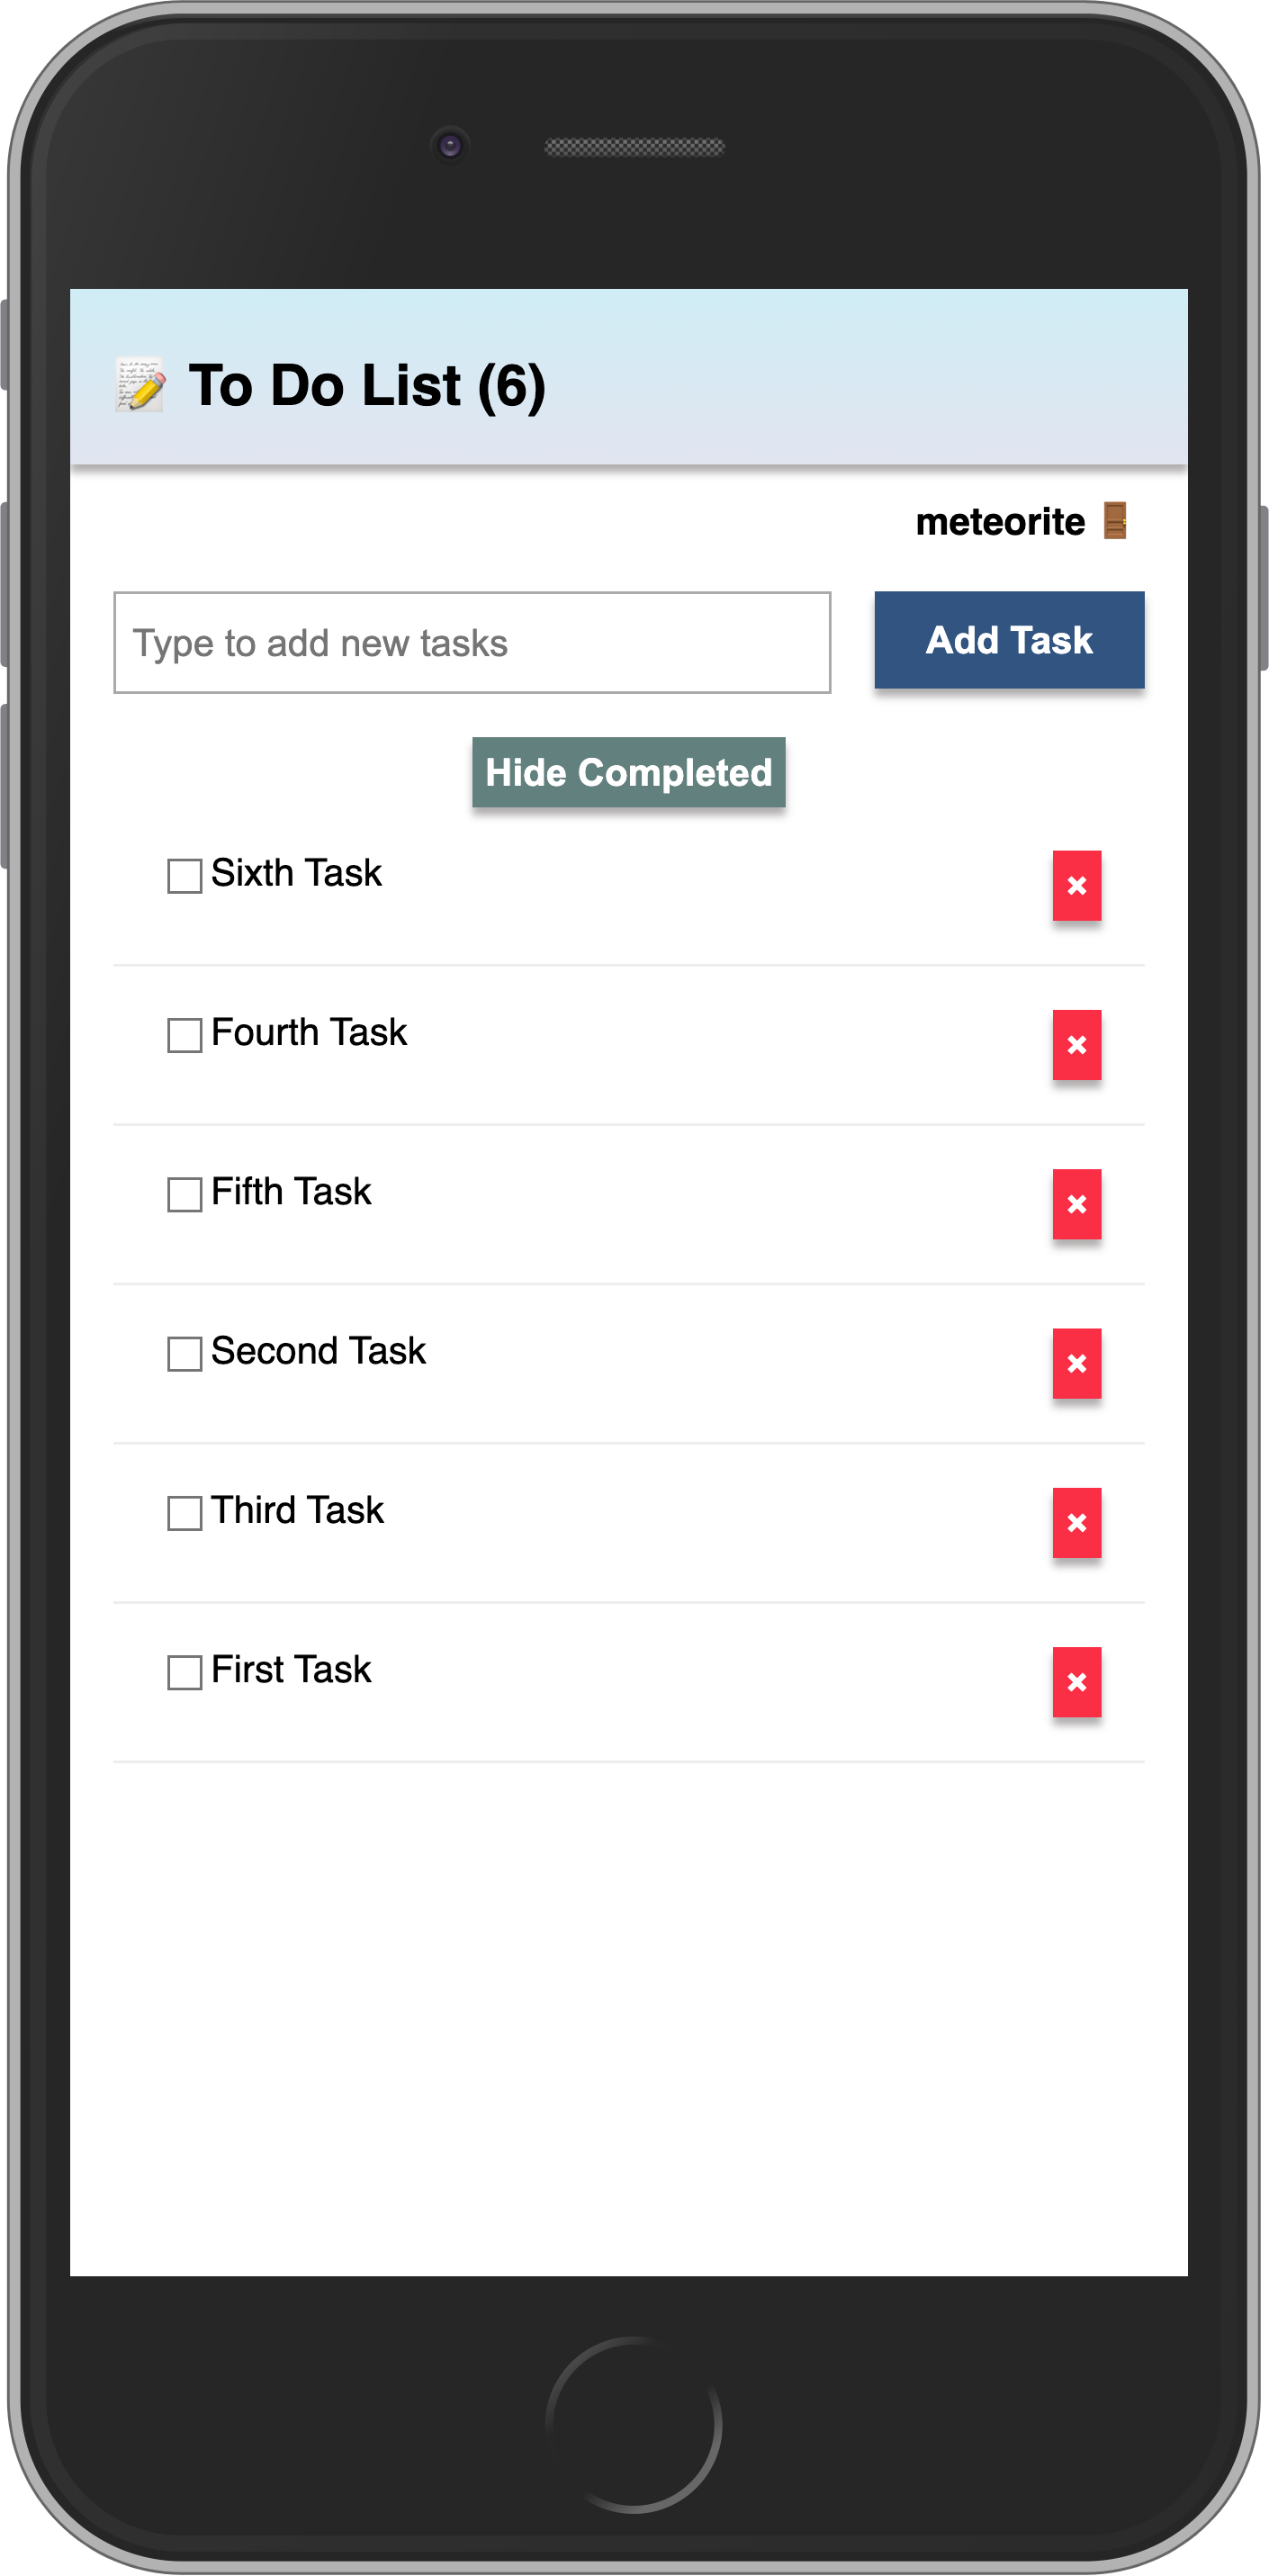
</div>Your app should look like this:
In the next step we are going to include user access in your app.
7: Adding User Accounts
7.1: Password Authentication
Meteor already comes with a basic authentication and account management system out of the box, so you only need to add the accounts-password to enable username and password authentication:
meteor add accounts-passwordThere are many more authentication methods supported. You can read more about the accounts system here.
We also recommend you to install bcrypt node module, otherwise, you are going to see a warning saying that you are using a pure-Javascript implementation of it.
meteor npm install --save bcryptYou should always use
meteor npminstead of onlynpmso you always use thenpmversion pinned by Meteor, this helps you to avoid problems due to different versions of npm installing different modules.
7.2: Create User Account
Now you can create a default user for our app, we are going to use meteorite as username, we just create a new user on server startup if we didn't find it in the database.
import { Meteor } from 'meteor/meteor';
import { Accounts } from 'meteor/accounts-base';
import { TasksCollection } from '/imports/api/TasksCollection';
import "../imports/api/TasksPublications";
import "../imports/api/TasksMethods";

const SEED_USERNAME = 'meteorite';
const SEED_PASSWORD = 'password';

Meteor.startup(async () => {
  if (!(await Accounts.findUserByUsername(SEED_USERNAME))) {
    await Accounts.createUser({
      username: SEED_USERNAME,
      password: SEED_PASSWORD,
    });
  }

  ...
});
You should not see anything different in your app UI yet.
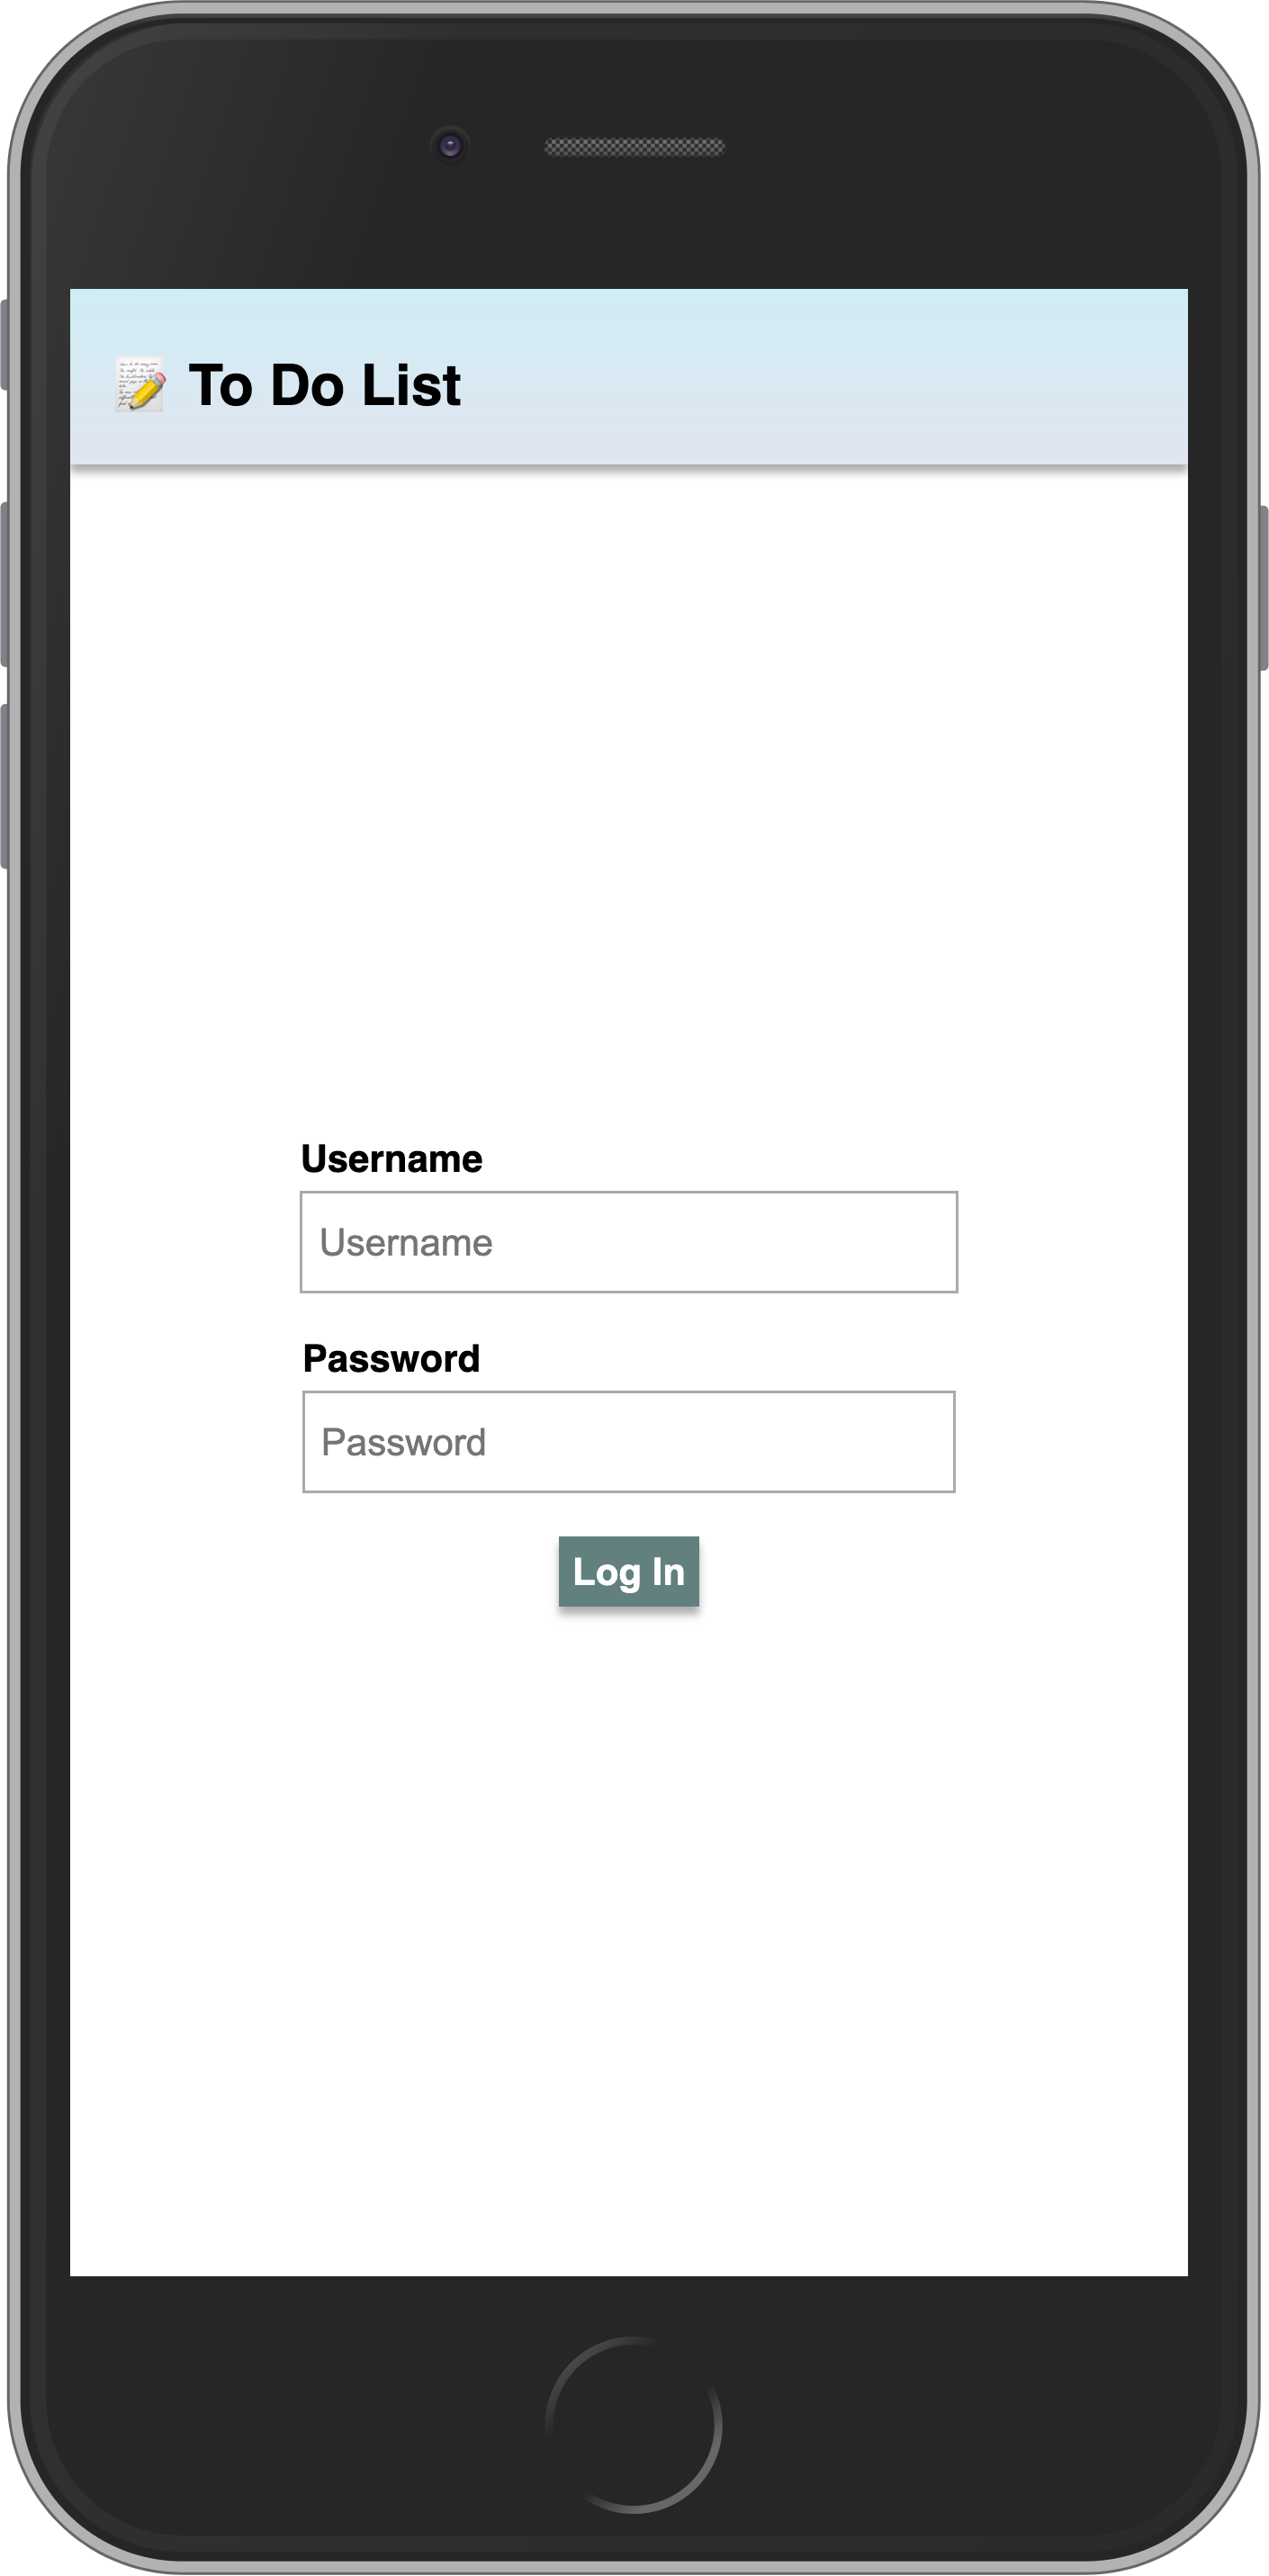
7.3: Login Form
You need to provide a way for the users to input the credentials and authenticate, for that we need a form.
Our login form will be simple, with just two fields (username and password) and a button. You should use Meteor.loginWithPassword(username, password); to authenticate your user with the provided inputs.
Create a new component Login.svelte in imports/ui/:
<script>
  import { Meteor } from 'meteor/meteor';

  let username = '';
  let password = '';

  async function login(event) {
    event.preventDefault();
    await Meteor.loginWithPassword(username, password);
  }
</script>

<form class="login-form" on:submit={login}>
  <div>
    <label for="username">Username</label>
    <input
      type="text"
      placeholder="Username"
      name="username"
      required
      bind:value={username}
    />
  </div>

  <div>
    <label for="password">Password</label>
    <input
      type="password"
      placeholder="Password"
      name="password"
      required
      bind:value={password}
    />
  </div>
  <div>
    <button type="submit">Log In</button>
  </div>
</form>
Be sure also to import the login form in App.svelte.
<script>
  import { Meteor } from "meteor/meteor";
  import { TasksCollection } from "../api/TasksCollection";
  import "/imports/api/TasksMethods";
  import Task from "./Task.svelte";
  import Login from "./Login.svelte";

  // ... rest of the script
</script>

<!-- markup will be updated in next steps -->
Ok, now you have a form, let's use it.
7.4: Require Authentication
Our app should only allow an authenticated user to access its task management features.
We can accomplish that by rendering the Login component when we don’t have an authenticated user. Otherwise, we render the form, filter, and list.
To achieve this, we will use a conditional block in App.svelte:
<script>
  import { Meteor } from "meteor/meteor";
  import { Tracker } from "meteor/tracker";
  import { onMount, onDestroy } from "svelte";
  import { TasksCollection } from "../api/TasksCollection";
  import "/imports/api/TasksMethods";
  import Task from "./Task.svelte";
  import Login from "./Login.svelte";

  let newTask = '';
  let hideCompleted = false;

  // Reactive state
  let currentUser = null;
</script>

<div class="app">
  <header>
    <div class="app-bar">
      <div class="app-header">
        <h1>📝️ To Do List {incompleteDisplay}</h1>
      </div>
    </div>
  </header>

  <div class="main">
    {#if currentUser} <!-- // -->
      <form class="task-form" on:submit={addTask}>
        <input type="text" placeholder="Type to add new tasks" bind:value={newTask} />
        <button type="submit">Add Task</button>
      </form>

      <div class="filter">
        <button on:click={toggleHideCompleted}>
          {#if hideCompleted}
            Show All
          {:else}
            Hide Completed
          {/if}
        </button>
      </div>

      <ul class="tasks">
        {#if subIsReady}
          {#each tasks as task (task._id)}
            <Task {task} />
          {/each}
        {:else}
          <div>Loading ...</div>
        {/if}
      </ul>
    {:else} <!-- // -->
      <Login /> <!-- // -->
    {/if} <!-- // -->
  </div>
</div>
As you can see, if the user is logged in, we render the whole app (currentUser is truthy). Otherwise, we render the Login component.
7.5: Login Form style
Ok, let's style the login form now:
.login-form {
  display: flex;
  flex-direction: column;
  height: 100%;

  justify-content: center;
  align-items: center;
}

.login-form > div {
  margin: 8px;
}

.login-form > div > label {
  font-weight: bold;
}

.login-form > div > input {
  flex-grow: 1;
  box-sizing: border-box;
  padding: 10px 6px;
  background: transparent;
  border: 1px solid #aaa;
  width: 100%;
  font-size: 1em;
  margin-right: 16px;
  margin-top: 4px;
}

.login-form > div > input:focus {
  outline: 0;
}

.login-form > div > button {
  background-color: #62807e;
}
Now your login form should be centralized and beautiful.
7.6: Server startup
Every task should have an owner from now on. So go to your database, as you learned before, and remove all the tasks from there:
db.tasks.remove({});
Change your server/main.js to add the seed tasks using your meteorite user as owner.
Make sure you restart the server after this change so Meteor.startup block will run again. This is probably going to happen automatically anyway as you are going to make changes in the server side code.
...

  const user = await Accounts.findUserByUsername(SEED_USERNAME);

  if ((await TasksCollection.find().countAsync()) === 0) {
    [
      "First Task",
      "Second Task",
      "Third Task",
      "Fourth Task",
      "Fifth Task",
      "Sixth Task",
      "Seventh Task",
    ].forEach((taskName) => {
      Meteor.callAsync("tasks.insert", {
        text: taskName,
        createdAt: new Date(),
        userId: user._id
      });
    });
  }

...
See that we are using a new field called userId with our user _id field, we are also setting createdAt field.
7.7: Task owner
First, let's change our publication to publish the tasks only for the currently logged user. This is important for security, as you send only data that belongs to that user.
import { Meteor } from "meteor/meteor";
import { TasksCollection } from "./TasksCollection";

Meteor.publish("tasks", function () {
  let result = this.ready();
  const userId = this.userId;
  if (userId) {
    result = TasksCollection.find({ userId });
  }

  return result;
});
Now let's check if we have a currentUser before trying to fetch any data. Update the reactive tasks and incompleteCount to only run if logged in:
<script>
  // ... other imports and code

  // Reactive state
  let handle;
  let subIsReady = false;
  let currentUser = null;
  let tasks = [];
  let incompleteCount = 0;

  let computation;

  $: incompleteDisplay = incompleteCount > 0 ? `(${incompleteCount})` : '';

  onMount(() => {
    handle = Meteor.subscribe("tasks");

    computation = Tracker.autorun(() => {
      subIsReady = handle.ready();
      currentUser = Meteor.user();

      if (currentUser) {
        const filter = hideCompleted ? { isChecked: { $ne: true } } : {};
        tasks = TasksCollection.find(filter, { sort: { createdAt: -1, _id: -1 } }).fetch();
        incompleteCount = TasksCollection.find({ isChecked: { $ne: true } }).count();
      } else {
        tasks = [];
        incompleteCount = 0;
      }
    });

    return () => {
      computation?.stop?.();
      handle?.stop?.();
    };
  });

  onDestroy(() => {
    computation?.stop?.();
    handle?.stop?.();
  });
</script>

<!-- markup remains the same -->
Also, update the tasks.insert method to include the field userId when creating a new task:
...
Meteor.methods({
  "tasks.insert"(doc) {
    const insertDoc = { ...doc };
    if (!('userId' in insertDoc)) {
      insertDoc.userId = this.userId;
    }
    return TasksCollection.insertAsync(insertDoc);
  },
...
7.8: Log out
We can also organize our tasks by showing the owner’s username below our app bar. Let’s add a new div where the user can click and log out from the app:
...
  <div class="main">
    {#if currentUser}
      <div class="user" on:click={() => Meteor.logout()}> <!-- // -->
        {currentUser.username} 🚪 <!-- // -->
      </div> <!-- // -->

      ...
Remember to style your username as well.
.user {
  display: flex;

  align-self: flex-end;

  margin: 8px 16px 0;
  font-weight: bold;
  cursor: pointer;
}
Phew! You have done quite a lot in this step. Authenticated the user, set the user in the tasks, and provided a way for the user to log out.
Your app should look like this:
In the next step, we are going to learn how to deploy your app!
8: Deploying
Deploying a Meteor application is similar to deploying any other Node.js app that uses websockets. You can find deployment options in our guide, including Meteor Up, Docker, and our recommended method, Galaxy.
In this tutorial, we will deploy our app on Galaxy, which is our own cloud solution. Galaxy offers a free plan, so you can deploy and test your app. Pretty cool, right?
8.1: Create your account
You need a Meteor account to deploy your apps. If you don’t have one yet, you can sign up here. With this account, you can access our package manager, Atmosphere, Forums and more.
8.2: Set up MongoDB (Optional)
As your app uses MongoDB the first step is to set up a MongoDB database, Galaxy offers MongoDB hosting on a free plan for testing purposes, and you can also request for a production ready database that allows you to scale.
In any MongoDB provider you will have a MongoDB URL which you must use. If you use the free option provided by Galaxy, the initial setup is done for you.
Galaxy MongoDB URL will be like this: mongodb://username:<password>@org-dbname-01.mongodb.galaxy-cloud.io .
You can read more about Galaxy MongoDB here.
8.3: Set up settings
If you are not using the free option, then you need to create a settings file. It’s a JSON file that Meteor apps can read configurations from. Create this file in a new folder called private in the root of your project. It is important to notice that private is a special folder that is not going to be published to the client side of your app.
Make sure you replace Your MongoDB URL by your own MongoDB URL 😃
{
  "galaxy.meteor.com": {
    "env": {
      "MONGO_URL": "Your MongoDB URL"
    }
  }
}
8.4: Deploy it
Now you are ready to deploy, run meteor npm install before deploying to make sure all your dependencies are installed.
You also need to choose a subdomain to publish your app. We are going to use the main domain meteorapp.com that is free and included on any Galaxy plan.
In this example we are going to use svelte-meteor-3.meteorapp.com but make sure you select a different one, otherwise you are going to receive an error.
You can learn how to use custom domains on Galaxy here. Custom domains are available starting with the Essentials plan.
Run the deployment command:
meteor deploy svelte-meteor-3.meteorapp.com --free --mongoIf you are not using the free hosting with MongoDB on Galaxy, then remove the
--mongoflag from the deploy script and add--settings private/settings.jsonwith the proper setting for your app.
Make sure you replace svelte-meteor-3 by a custom name that you want as subdomain. You will see a log like this:
meteor deploy svelte-meteor-3.meteorapp.com --settings private/settings.json
Talking to Galaxy servers at https://us-east-1.galaxy-deploy.meteor.com
Preparing to build your app...
Preparing to upload your app...
Uploaded app bundle for new app at svelte-meteor-3.meteorapp.com.
Galaxy is building the app into a native image.
Waiting for deployment updates from Galaxy...
Building app image...
Deploying app...
You have successfully deployed the first version of your app.
For details, visit https://galaxy.meteor.com/app/svelte-meteor-3.meteorapp.com
This process usually takes just a few minutes, but it depends on your internet speed as it’s going to send your app bundle to Galaxy servers.
Galaxy builds a new Docker image that contains your app bundle and then deploy containers using it, read more. You can check your logs on Galaxy, including the part that Galaxy is building your Docker image and deploying it.
8.5: Access the app and enjoy
Now you should be able to access your Galaxy dashboard at https://galaxy.meteor.com/app/svelte-meteor-3.meteorapp.com.
You can also access your app on Galaxy 2.0 which is currently in beta at https://galaxy-beta.meteor.com/<your-username>/us-east-1/apps/<your-app-name>.meteorapp.com. Remember to use your own subdomain instead of svelte-meteor-3.
You can access the app at svelte-meteor-3.meteorapp.com! Just use your subdomain to access yours!
We deployed to Galaxy running in the US (us-east-1), we also have Galaxy running in other regions in the world, check the list here. This is huge, you have your app running on Galaxy, ready to be used by anyone in the world!
9: Next Steps
You have completed the tutorial!
By now, you should have a good understanding of working with Meteor and Svelte.
INFO
You can find the final version of this app on GitHub using the Rspack bundler or the Meteor bundler.
Here are some options for what you can do next:
- Check out the complete documentation to learn more about Meteor 3.
- Read the Galaxy Guide to learn more about deploying your app.
- Join our community on the Meteor Forums and the Meteor Lounge on Discord to ask questions and share your experiences.
We can't wait to see what you build next!